This page introduces you to the course page. If you are looking for information on taking attendance or setting up assignments and grade book, please visit those pages directly. Otherwise, keep reading.
For faculty members, the course page is the heart and soul of myHeritage. You are expected to use the academics section at least to maintain an online grade book for each of your classes, and to take weekly attendance for each of your classes, but the learning platform will also allow you to upload notes, create lessons, post discussions, communicate updates, and even administer automatically-graded tests. This section will introduce the course page of myHeritage, and explain to you how to set up a grade book and take attendance.
Courses are accessed on your home page (see Introducing the Home Page #9). The automatic view is for the current semester, but you can click on the drop-down menu under Courses to select an alternate semester.
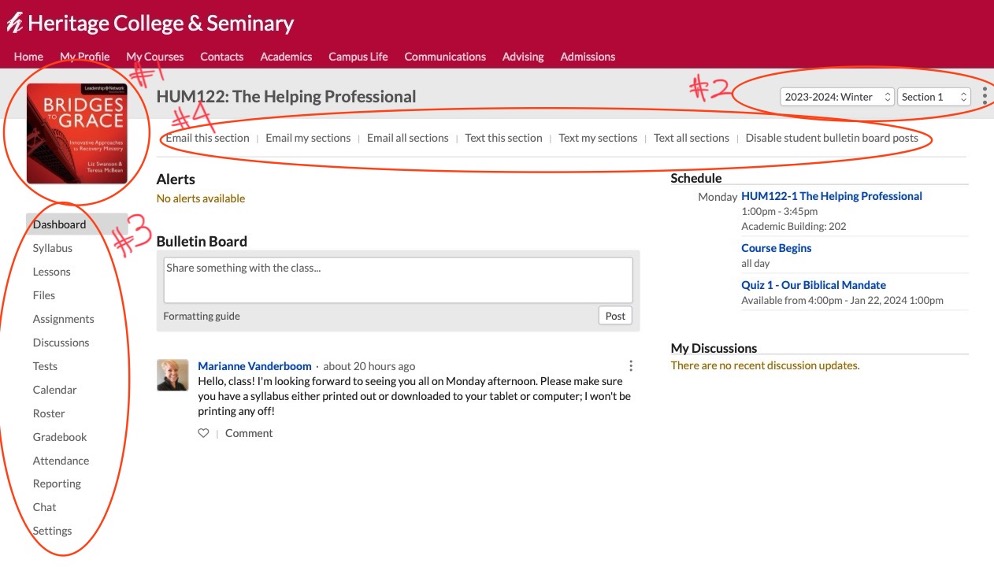
- Set a profile picture for your course by clicking on the photo and choosing “Click to Edit”. You can upload a photo of one of your course textbooks or another suitable image.
- These two drop-down menus tell you which course you’re looking at. They are automatically set to the most recent iteration of the course and Section 1 (on-campus). If you are teaching an on-campus class, you will probably also have online students (Section 23). You can use this drop-down menu at any point to toggle between the two sections of the same class.
- The tabs across the top allow you to generate group emails or texts.
- The tabs down the left side of the screen bring you to the various sections of your course.
Dashboard
When you click the course link, you visit the course dashboard. It contains the Bulletin Board for this course, which is visible only to the faculty and students enrolled in this course. The Bulletin Board is an effective way to make class announcements or send out reminders to your students, or for your students to ask you questions or make comments. Bulletin board posts are visible only here on the course dashboard.
The Dashboard also lists any upcoming events and due dates (if you use the calendar).
Syllabus
This page is automatically generated and should be edited only in limited fashion.
- Course Info and Faculty includes course code, term, and credit hours. This is automatically generated and cannot be edited. Phone numbers beside the faculty name are not visible to students.
- The description is entered by the registrar’s office and cannot be edited. The course description on your syllabus must match the description listed here. This is the broad description of the course as it needs to be taught to help meet the program objectives and the mission of the school.
- Assignment Groups is automatically generated as you enter assignments in the Assignments tab.
- Syllabus. Your syllabus will be uploaded by the registrar’s office once it has been submitted, checked, and approved. Please DO NOT upload your own version of the syllabus unless it has been checked and approved. Syllabi cannot be changed after the beginning of the term.
- Links are added by the registrar’s office. You may add links to this section, but do not delete or change any that are already there.
- Reading List is automatically generated by the bookstore. Check that the books listed are correct, and if they are not, please report the error to the registrar’s office. Please do not make any changes to the books listed.
- Files are added by the registrar’s office. They include course change forms, proctor forms, and a copy of the Heritage Manual of Style. You may add files to this section, but do not change or delete anything already there.
Lessons
The lessons section of myHeritage allows you to organise your assignments and the content of your class into weekly sections. Simply use the “Add a Lesson” button on the right to create a lesson. You can then name it and set availability and click save. From there, you can add headings and text, upload files such as class notes for that lesson, include links, create discussions, and include assignments and tests. (Note: you must create assignments and tests first under the Assignments tab.) Using the Lessons feature is a fantastic way to help students stay organised or, for on-campus and live-streaming students, to upload video lectures in case of snow days or other missed days.
Files, Discussions, and Calendar
Files is a centralised list of all the files that are uploaded to your course, including the syllabus, course change forms, and the Heritage Manual of Style. If you do not set up lessons and assign files to individual lessons, you can still upload class notes here, to allow your students access to the notes.
Discussions are a great way to get students to interact with each other and the material you are teaching. You will pose a question to which students respond. They can then also respond to each other. The Discussions tab is a centralised list of all the discussions that are generated in your course. If you do not set up lessons and assign discussions to specific lessons, you can still generate discussions here.
The Calendar will show at a glance when you have classes and what assignments are due on which days.
Settings
Most of the items under the settings tab are automatically generated and cannot be changed. However, if you are teaching on-campus (Section 1) and live-streamed (Section 23) students, before you set up a new course, you should scroll to the bottom of the settings page and click the “sync” setting to “yes” for both sections of your class. This will mean that any changes you make to one section (such as setting up assignments, lessons, and discussions, or adding files and links) will automatically be made to the second section. Sync will not affect the entering of attendance or grades or posts to the discussion board. Those areas will still operate independently.