Writing a Heritage Syllabus

The Big Picture

The mission of Heritage Baptist College is to provide an evangelical, faith-based, university-level education to equip students for life and service in the church, community, and the world.

Every certificate and degree we teach at Heritage seeks to fulfill that mission. Further, each certificate and degree we teach has its own mission: to prepare students for pastoral ministry, or youth ministry, or intercultural ministry, for example. Each course has been created to fit into that bigger picture.

So, the course you are teaching already has a course description, which gives a broad-strokes explanation of what that course is about. This ensures that the course will fit into the bigger picture as it should. What exactly is taught, how it is taught, and how it is evaluated is entirely up to you as the course’s professor. Those are the elements you will be creating in the syllabus.

The syllabus is a legal document between the professor and the students. Once it has been submitted and posted, it cannot be changed without the consent of the students in the class. Further, it is the professor’s obligation to follow the syllabus to the very best of his or her ability.

This document will help you to craft a helpful syllabus.

Elements of the Syllabus

This section will walk you through the syllabus elements and how best to complete them.

  1. Instructor: Fill in your name (and possibly how you wish to be addressed), and when and how you are available for consultation. We do not recommend giving students your private email or cell phone number. Please use a Heritage email, and if you wish for students to be able to text you, sign up for text notifications on myHeritage and tell them they can text you via myHeritage. This provides privacy protection for both you and the students.
  2. Course description: Copy the course description as it is found on myHeritage. Please do not alter it without first contacting the Dean. This ensures that the course will appropriately fit into the bigger picture of Heritage’s academics.
  3. Course objectives: The objectives will list the specific learning outcomes you wish students to achieve by the end of the course. To ensure a holistic education, objectives should cover cognitive aspects of the material (knowledge-based outcomes), affective aspects (character and attitude-based outcomes), and psychomotor aspects (skills-based outcomes). Objectives should be specific and directly measurable through the assessment measures. That is, if you indicate you want students to know something, you need to clarify how you will know that they know.
  4. Course texts: The books you choose as course texts are up to you. Remember that Heritage is providing a university-level education, so texts should be sufficiently advanced, but books written at the lay level are also appropriate. Texts should be readily available, and we do try to to keep textbook costs somewhat reasonable. One very expensive text is fine, but three for one course are probably not. A textbook does not need to cover the entirety of the material of the course, but should contribute in some way to fulfilling the objectives. Readings other than textbooks are permitted, but would not be listed under textbooks unless they are resources that students are expected to procure on their own.
  5. Writing Style and Syntax: This section is standard for all syllabi.
  6. Confidentiality and Records: This section is standard for all syllabi.
  7. Course Requirements: 
    • Requirements regarding attendance, course evaluations, and library resources are standard for all syllabi. Other course requirements can be changed. If you wish to allow or disallow cell phones, tablets, laptops, eating or drinking, etc, or you have other requirements not listed, you can add them to this section of the syllabus.
    • Readings: Specify here when you expect reading to be done by (before class begins or after class), and whether or not there will be additional reading beyond that of the listed class texts. If you have additional reading, indicate approximately how many pages of additional reading students can expect.
    • Assignment submissions: Indicate here what your policy is regarding how assignments are submitted, when they are due, and any extension policy you set.  Please note that assignments submitted late without any prior extension agreements must be penalised with at least 10% reduction in the final grade per 24-hour period, but can be penalised with a reduction of up to 100% in the final grade (essentially a grade of 0 for any late assignment). In addition, you are not expected to grant extensions except in extenuating circumstances, nor do we encourage a lax policy for extensions and late submissions. Please make and follow through with the policies you set here. Assignments can be submitted by hard copy, by emailing files to the professor, or by uploading them to myHeritage. Clarify in the syllabus which you would prefer.
    • Course assignments: Here, you will outline your assessment methods. For each assessment method, you will want to specify the kind of assignment/title, its due date, its percentage of the overall mark, and a description which will help students to see how this assignment is evaluating the objectives listed earlier. A few pointers below will help in creating course assignments:
      • First-year courses (100 course codes) should rely more heavily on quizzes, tests, and exams than on research and writing. Upper classes should rely more heavily on research and writing, and may not include exams at all, unless that is deemed the most effective way of measuring the objectives.
      • No single assignment should be worth more than 40% of the final grade.
      • Assignments should be spread somewhat evenly throughout the semester so that students are able to evaluate their progress by mid-term.
      • Assignments should be weighted according to the time taken to complete them.
      • The more clarity you can provide students regarding expectations of assignments, the better students will do and the fewer questions they will ask. At minimum, specify word count and a description of the topic.
  8. Anticipated workload: This allows students to see how they should be managing their time in the course, and ensures that the course is rigourous enough without being too rigourous for a university level. Add up all the numbers. To be a suitable workload for a university-level course, you should have approximately 80 hours of work in total for the semester.
    • In the chart, under the readings, list all the reading (including texts and articles) that students will be doing, including the number of pages in each. Count on one minute per page, and figure out how many hours each reading will take.
    • Under quizzes and exams, list all quizzes and exams students will be taking, and estimate how long it will take for students to prepare for each.
    • Under assignments, list all assignments the students will be writing and provide a number of hours each will take. For writing that does not require any research, figure on approximately 30 minutes per page. For writing that does require research, figure on approximately 1-1.5 hours per page, depending on the level of research required.
  9. Level of achievement: This is standard to all syllabi.
  10. Course schedule: Students rely heavily on this section of the syllabus to keep track of what they have to do and what to expect for the class. When a topic is listed in the syllabus and that is then not covered, they struggle to follow. Remember, the syllabus is a contract between professor and student. This schedule helps students to see the coherence of the course and to be assured that objectives are being covered appropriately.
    • In the Date column, list the dates for the semester. Include dates for special events on which you may not have class, such as stat holidays, Missions’ Conference or Reading Weeks. You will find these dates on myHeritage and in the email that the administrative assistant sent to you.
    • In the Topic column, list a brief description of what will be covered in the week’s lecture. If there is no class due to a special event, write, No Class. If you have a special speaker coming in, include that.
    • In the Reading column, list what reading is due for that class. Include book title and chapter, or the title of any articles.
    • In the Assignments column, list whatever assignments are due that week. If you have an assignment that is due each week (such as a summary of reading), then list it every week.

When You’re Done

Congratulations! You wrote a syllabus! Now what?

You received an email from the administrative assistant which contained a link to a Sharepoint folder. Upload your new or revised syllabus to that Sharepoint folder on or before the date syllabi are due.

From here, your syllabus will be checked to ensure that it is complete and correct.  When it is so, the updated copy will be uploaded to your course page on myHeritage. This version will become the official and binding copy of the syllabus. Your students will be able to download it and print it from there.

At the beginning of the first class, you should go over the syllabus with your class to ensure that they are familiar with it, and to give opportunity for any questions they may have.

A Recording Studio in Your Pocket

There are almost unlimited options for recording video material in a professional way these days.  This article discusses some best practices for setup, getting a good picture, capturing good audio, and goes through a few recording hardware and software combos.  At the end, I’ll show you how to publish that material on myHeritage (Populi).

Setup

The good news is, that you can get a quality recording with almost any modern computer hardware.  You can record with something as simple as a smartphone, or something as elaborate as a camcorder or DSLR camera.  However, the most important element of your video is lighting.

When recording, make sure your face is front lit, rather than back lit.  Try to angle yourself in the room so that the brightest lights or windows are in front of your face, and not directly behind you.  If possible, angle the primary light source (called a key light) so it is just slightly off-axis to one side – no more than 45 degrees.  You can accomplish this by using natural light sources like a nearby window, or light fixtures that already exist in your room.  You can also opt to purchase a small light kit with a stand for greater control.  This will ensure that your face is well lit and easy to see, and the off-axis angle will help provide some controlled shadows and depth for a more natural look.

Regardless of what hardware you have, do your best to mount the camera so it is just above eye level.  Frame yourself in the middle of the frame with your eyes about one-third from the top edge of the frame.  This will provide the most natural composition.

If you are using a smartphone or tablet, using some kind of clip or stand can help you angle the camera in the right way.  Feel free to get creative with how you ‘mount’ the camera (or smartphone).  No one will see your setup anyway, and spending a bit of time to get the camera in the right spot can really pay off.

If you are using a laptop with a webcam, try propping the laptop up on a stack of books to get the camera higher.  A music stand can be very helpful if you have one available.

Record in a quiet room.  This probably goes without saying, but I’m going to say it anyway.  Audio is as important, if not more important, than the quality of your video.  People will suffer through bad video if the audio quality is good.  But if the audio quality is bad, it makes folks want to turn it off.  So, record in a quiet room that contains some furniture.  Recording in a room with many hard surfaces can make speech less intelligible and therefore harder to listen to.  The build-in microphones in modern laptops and smartphones can produce good audio results, but only in a quiet room.  So, record in a quiet room such as an office with a bookshelf full of books, or a bedroom with a carpet and a bed.

Always do a test recording or two (or five) and listen back to see how they sound before you commit to an entire lecture.  A set of headphones, or even earbuds, can be extremely helpful in hearing how the recording sounds.

To sum up…

  • Put the primary light source (key light) in the room, in front of you, and not behind you.
  • Mount the camera so it’s just above your eyeline (ever so slightly).
  • Record in a quiet room.
  • Do some test recordings before you commit to a whole lecture.

Record

There are so many hardware options for recording nowadays.  Laptops, smartphones, tablets, pocket recorders, field recorders, USB/thunderbolt interfaces, and more.  The list goes on and on.  The hardware commonly available today would have cost multiple thousands of dollars twenty years ago.  Essentially, we all have access to a modern, high-quality portable recording studio.

Camera App on iOS and iPadOS

The Camera app in iOS and iPadOS is the easiest option that produces the highest quality results.  The app gets consistently good results by recording the built-in cameras (front or rear) on an Apple iPhone, iPod Touch, or iPad.

  • Setup your lighting and camera rigging/stand/pop-socket.
  • Open the Camera app and frame yourself as described above.
  • Choose video mode and hit record.
  • Remember to test audio.

Once you’re done recording, copy the file off of your iOS device.  There are a couple ways to do this.

  • Copy the file directly to your computer by plugging it in over USB.
  • Upload the file to cloud-based storage such as iCloud, Microsoft OneDrive, or Google Drive.  Then download the file to your computer.

Alternatively, you can upload the file directly from your smartphone to myHeritage.  See below in the section called Publish.

Other Options on iOS

iMovie

You can also use iMovie to capture quality recording from the build-in cameras.  iMovie gives you more control over the recording settings but is harder to use.

Filmic Pro

This is an iOS (and Android) app built by a third-party that gives the film maker complete control over your recordings.  You can tweak the resolution, framerate, bitrate, audio, and other settings.  It comes at a cost, but is worth it if you need that level of control.

MacOS and the Webcam

If you own a MacBook or an iMac, you are blessed with a device that has all the hardware built-in to get decent quality recordings.  Below are a few apps that can help you capture the magic.

iMovie

This guide isn’t meant to be a full-blown tutorial on how to use iMovie, but if you have access to iMovie, it’s an easy way to get started recording and get professional results quickly with a

  • In iMovie, open File -> Import Media…
  • In the left column select FaceTime HD Camera, your webcam will be displayed.
  • Press the Record button in the middle and record your clip.  Press it again to stop.
  • Click Close.
  • In the My Media view, your new clip will appear.
  • Import it into a timeline (below), do any necessary trimming or adding other clips, or titles.
  • Choose the Share button in the top-right of iMovie to export your video to a file.

QuickTime

MacOS comes pre-installed with QuickTime.  You can use QuickTime to capture your webcam and built-in microphone.  To capture a movie in QuickTime, try this.

  • Find and launch the QuickTime Player app.
  • Open File -> New Movie Recording.
  • Click the red record button.
  • Save and upload your movie file to myHeritage.

Publish

At Heritage, we use myHeritage (Populi) to publish our course content.  For your course, this can be done from the Lessons tab.

Upload them from your computer

  • Click the Add a Lesson button or open an existing lesson.
  • Click the Design tab to open the design view.
  • Choose to Add a Section and click File.
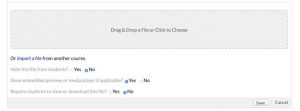
  • Drag and drop the file from your computer into the area that says Drag & Drop.
  • Once the video file is uploaded, click Save.  If this is a video file, the size is likely huge, so be patient.
  • There are other options in this view like marking a file as required.
  • When you save the file, Populi kicks off an encoding process (much like YouTube’s encoding) to get it ready for multiple device types.

Upload them directly from your phone or tablet

If you’ve recorded your file on a smartphone or tablet, you can upload them directly to myHeritage.

  • Open myHeritage is a browser (Safari, Firefox, Chrome, etc.) and login with your myHeritage account.
  • Navigate to your course and open the Lessons tab.
  • Touch the Add a Lesson button or open an existing lesson.
  • Touch the Design tab to open the design view.
  • Choose to Add a Section and click File.
  • Touch on the area that says Drag & Drop a File or Click to Choose.  This will open the file explorer on your platform.
  • For example, on iOS choose Photo Library.  Find the video you took (or edited) and touch Done.
  • Once the video file is uploaded, click Save

Populi has published a more detailed article on this topic called How to embed audio, video, and other kinds of files in a lesson.  Feel free to check it out for more info.

Record audio with an iOS device

This tutorial is a quick overview of getting a good-quality recording using an iOS device.  This method would be appropriate for an iPhone, iPad, or iPod touch.  The theories can also be translated to an Android device.  The basic steps are.

  1. Record audio with the Voice Memos app or a similar app.
  2. Upload the file to cloud storage, like Microsoft OneDrive (which you have access to with your Heritage account), Google Drive, Dropbox, or something similar.
  3. From that point you can access the file and download it so you can post it on your class in myHeritage.

Recording basics with Audacity

Hello folks!  This video is meant as a brief introduction to recording audio with Audacity.  We record an audio clip and do some minor tweaking to the sound quality before exporting it for publication.

The audio you hear in this tutorial was recorded with the build-in mic from a USB webcam.  Super simple.  To record into Audacity, other microphone options could include the build-in microphone in a laptop, the in-line microphone on simple wired earbuds, or even a large USB microphone.

Using myHeritage for Online Lessons

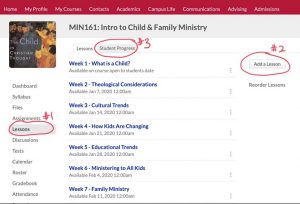
Log on to your course page on myHeritage. This is the same place you take attendance and enter grades. Along the left side is a column reading Dashboard, Syllabus, Files, Assignments, Lessons, Discussions, Tests, Calendar, Gradebook, etc. (See #1 in photo below.)

Create A Lesson

(all photos are from Marianne’s Intro to Children’s Ministry class)

  • Click on the Lesson tab. You will see this (click image for large version):

(click image to enlarge)

  • Click on the Add a Lesson tab. (See #2 in the photo above.)

(click image to enlarge)

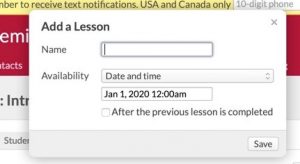
  • Give the lesson a title and set the date and time it will be available (generally the time your class would normally start). If you click “after the previous lesson is completed”, that will override any date and time you make the lesson available. I usually leave it unchecked.
  • Add one lesson for each class you have left in your semester. You will see them appear as a list, as you can see in the first photo.
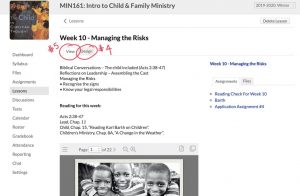
  • To give your lesson content, click on one of the lessons you have just created. It will open up to two tabs, as seen below:

(click image to enlarge)

My lesson already has content. Yours will be blank. The “view” tab (#5) is how the lesson will look to your students. The “design” tab (#4) is where you will add the content. Click it. Photo is on the next page. I don’t have time for fancy formatting!

(click image to enlarge)

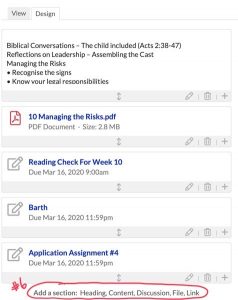
Again, my lesson already has some content. But you will see the line at the bottom, #6.

A heading is just that. A text box will open up and you can type directly in it, and on the view tab, you’ll have a nice, bold heading.

Content is like what you see at the top of my lesson to the left. Again, a text box will open up. You can type in it directly to give the students directions, information, whatever. I think you can even add photos to that content. The text is fully formattable. (You can underline, highlight, use italics, bold, etc.)

Discussions allow you to post a topic and have students interact with that topic and with each other. I’ll talk more about that below.

Files are your Powerpoint slides (I always save them to PDF and upload the PDF) and your audio or video files. I’ll talk about that more below.

Link allows you post a link to a website or YouTube video. More below.

Lesson Content Types

Discussions

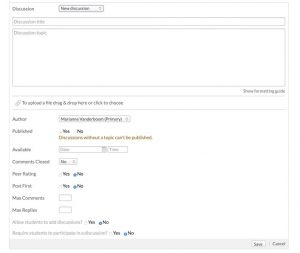
Discussions are helpful ways to get students to interact with the material and each other in lieu of face-to-face interaction. Add a discussion and this box will open up. Give your discussion a catchy title, and then in the topic box create something for students to talk about. You can also drag and drop files or photos for students to interact with.

  • Beside Published, click yes.
  • Beside available, click the date of your class.
  • Beside Comments closed, click no.

Peer rating means that students can evaluate their peers’ comments. I don’t find it helpful, but to each his or her own.

Post first means that students must first reply themselves to the topic posted before they can see their peers’ posts. This is helpful to ensure originality of ideas.

Max comments and max replies are helpful if you have a student who posts dozens of times. As if. I usually leave these blank.

Allow students to add to the discussion: I usually click no. Probably because I’m a control freak. Mostly because I don’t know what it means. It’s never hindered my discussions online.

Require students to participate in the discussion. It is important that you click “yes” for this. It is the only way we can track participation for attendance.

Files

This is what you will use to upload lecture notes (Powerpoint) and audio or video recordings.

I always save my Powerpoint slides as a PDF and upload the PDF.

Drag and drop the files you want to upload.

Hide file from students: No. What would be the point?

Show embedded preview player: Yes. This allows the students easy access to the files.

Require students to view or download? Yes. Again, it is how we will measure lesson completion for attendance records.

Links 

If you add a link, this box will open. You can give the link a title, and then copy and paste the URL (website). The students will see the title as a hyperlink.

Again, if you use a link, require the students to click it for attendance purposes.

Conclusion

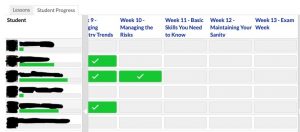
Ok, that’s your lesson. Now go back to the very first photo, and have a look at #3.  If you click on that, you will see a graph that looks like this:

(click image to enlarge)

Each lesson will have a status bar showing how much of the lesson has been completed (if you’ve required all the elements to be done). If the student has completed the whole lesson, you can then mark that student as “present” in the attendance tab. If a student has not completed the lesson (or hasn’t completed enough of the lesson), you can mark that student as absent. You may notice that myHeritage now has a “notes” section beside each student’s name on the attendance roster. If a student is finished part but not all of the lesson, you could mark that student present and make a note of how much of the lesson was complete. If the student then has another lesson that is only partly completed, you could make that note and mark the student as absent the second time.

Posting audio or video content to a course in myHeritage

  1. Login to myHeritage and navigate to your course (either under Academics -> Academic Term -> Courses or by going to My Profile -> Faculty) by clicking on the course name. The course Syllabus page will appear.
  2. Choose Lessons from the menu on the left.
  3. Choose a Lesson (if there are no Lessons in the course, click the Add a Lesson button on the right).
  4. From the Lesson view there are two tabs, View and Design. Choose the Design tab.
  5. From the Design tab you have the ability to Add a section. Click the small link that says File to add a media file.
  6. Drag and drop the media file into the upload area that appears or click the area to choose a file.
  7. Once the file has completed uploading, click the Save

Please see the How To Embed Audio, Video, And Other Kinds of Files In A Lesson article on the Populi Knowledgebase for similar instructions and further details.

Note: To view the newly uploaded file like a student would see it, go back to the View tab (from Design).  When you are uploading the file you also have options to Hide the file or use the media player built in to myHeritage (strongly recommended).  Also, there is a file size limit of 4GB per file.