Welcome to Heritage

An Orientation Guide for Adjuncts and New Faculty

We are genuinely delighted that you have decided to join the team. You play an important role in helping us to fulfil our mission to provide an evangelical, faith-based, university-level education to equip men and women for life and service in the church, community, and the world. This brief welcome document aims to provide you with the information you need to begin your role at Heritage.

Timelines

Because our students register early for courses, our timelines to prepare for the next semester run early. As you prepare for the term, please be aware of these important events:

  1. Choosing course textbooks. You will receive an email quite early (generally in early February for Fall term courses, and in early October for Winter term courses). Please have your textbook selections done by this time so that texts can be ordered in time to stock them in the bookstore for the upcoming semester.
  2. Writing your syllabus. Syllabi are due six weeks before the term begins. Fall syllabi will be due in early August, and Winter syllabi will be due in late November or early December. You will receive an email to remind you of these dates, and an email with a link where your syllabi can be uploaded. Instructions on writing syllabi will be provided in the first email you receive.
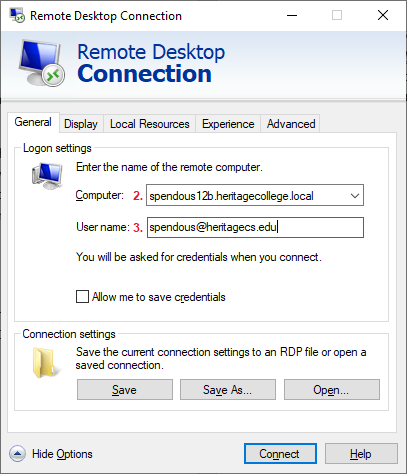
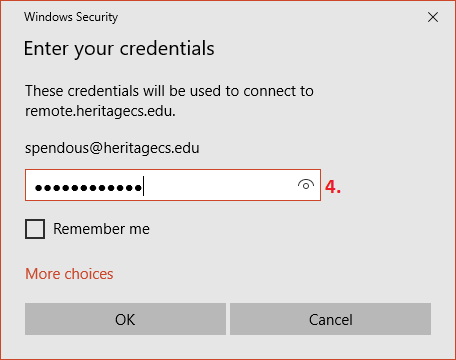
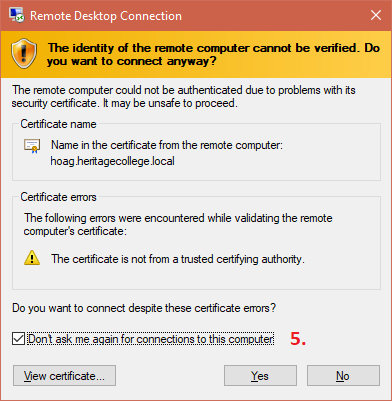
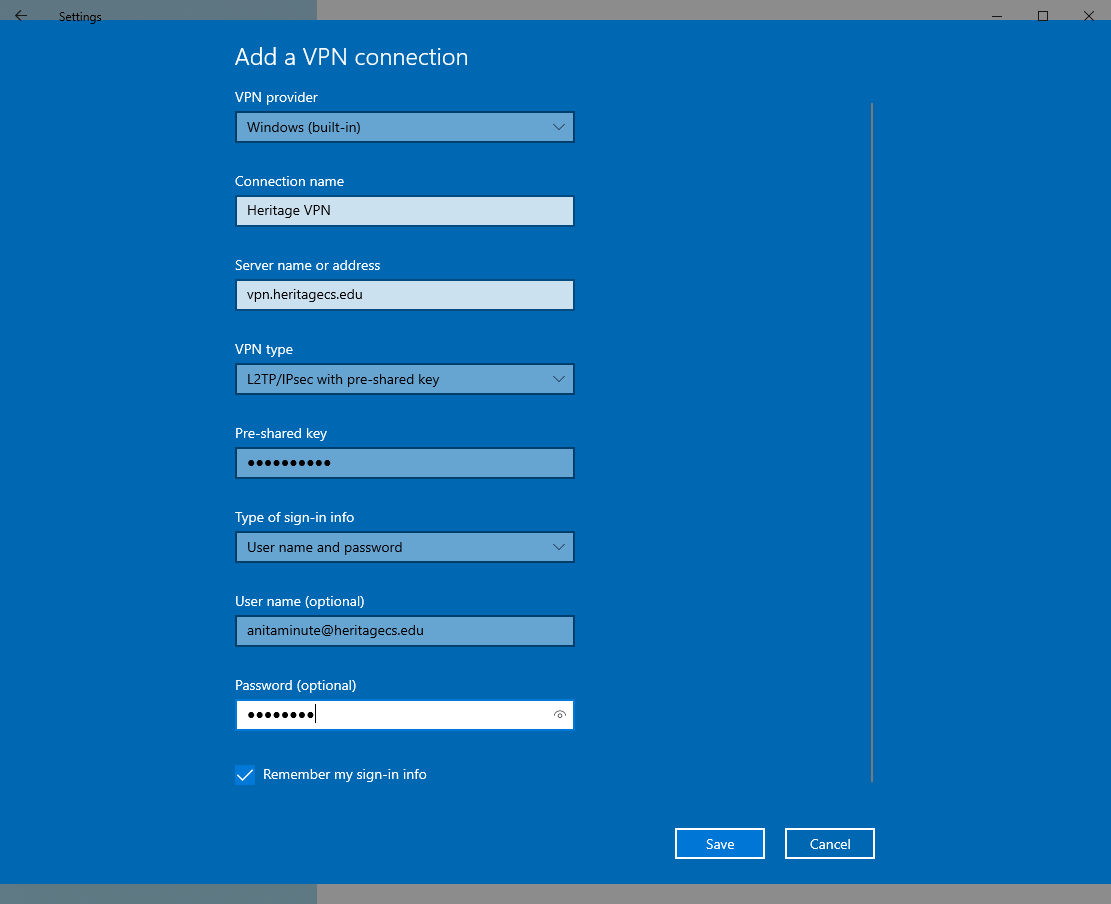
  3. Setting up your course on myHeritage. At some point before the beginning of the term, you will be required to familiarise yourself with myHeritage and set up your gradebook there. There are guides you can work through here.

Finding Your Way Around
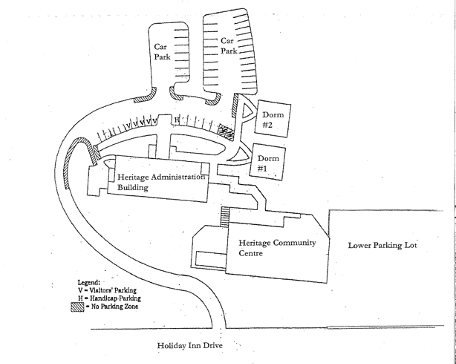
Parking is available at the top of the hill behind the Academic Building. Parking is free at Heritage.

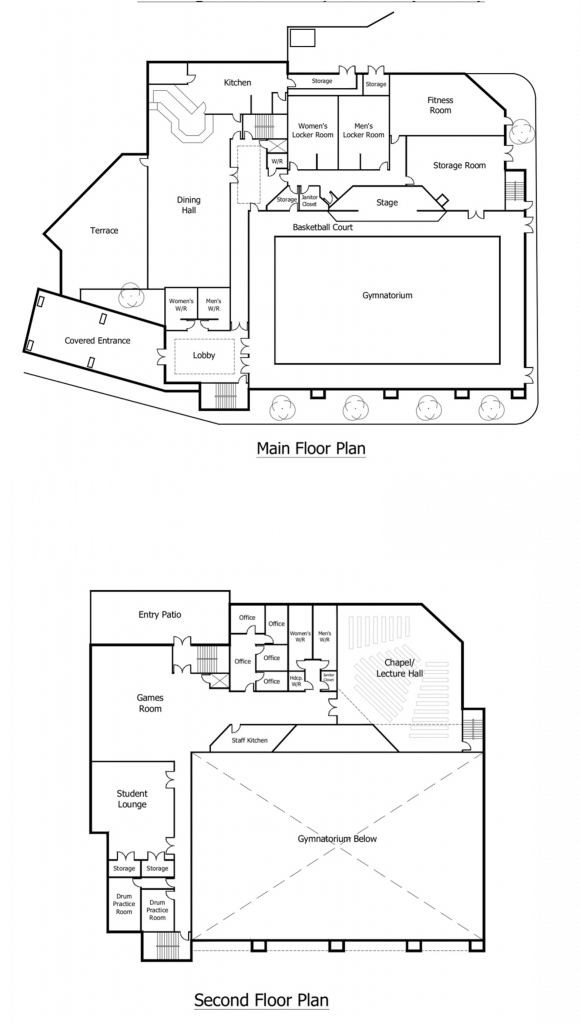
The Academic Building contains classrooms, faculty offices, and the library. There is also a staff lunchroom with a fridge, stove, and microwave as well as coffee available to staff and faculty.

The Community Centre contains the chapel, the Bean (our on-site coffee shop) and the cafeteria. Hours at the Bean and the cafeteria are variable.

Numerous fast-food restaurants are within walking distance of campus, including a Tim Hortons and a Starbucks (in the Zehrs grocery store).

Photocopiers are in the main office and in the library in the academic building.

Faculty mailboxes are in the main office.

Classroom Setup

All on-campus Heritage classes are also live-streamed. Classrooms are equipped with a large-screen TV at the back of the room on which you will see your online students. Classrooms are also equipped with computers and projection units for any slides you may wish to use. You are free to use your own computer and to airplay your presentation to the classroom screens. A list of classroom equipment is regularly updated here.

Please ensure you arrive to class at least 15 minutes before class starts so you have time to connect. We will attempt to have IT personnel present the first few weeks to help you with this process. You can find further information on setting up a connected classroom by watching this video.

The classrooms are furnished with tables and chairs, which can be moved but must be put back at the end of class.

Classrooms also have a whiteboard and markers supplied.

Important Names If You Have Questions

  • Assistant Dean: Currently Marianne Vanderboom. Questions regarding how to write syllabi, setting up myHeritage, classroom concerns, academic policies, or any question you don’t know where else to direct.
  • Receptionist: Currently Carolyn Burgess. Questions regarding photocopying, parking, keys, and finding your way around campus.
  • Registrar: Currently Sandi Brubacher. Questions regarding scheduling, attendance records, and final grades.
  • Bookstore admin: Currently Cassie Talabis. Questions regarding textbooks.
  • Administrative Assistant: Currently Lucille Baxter. Questions regarding uploading and editing syllabi, collection of CVs and transcripts.
  • IT personnel: 
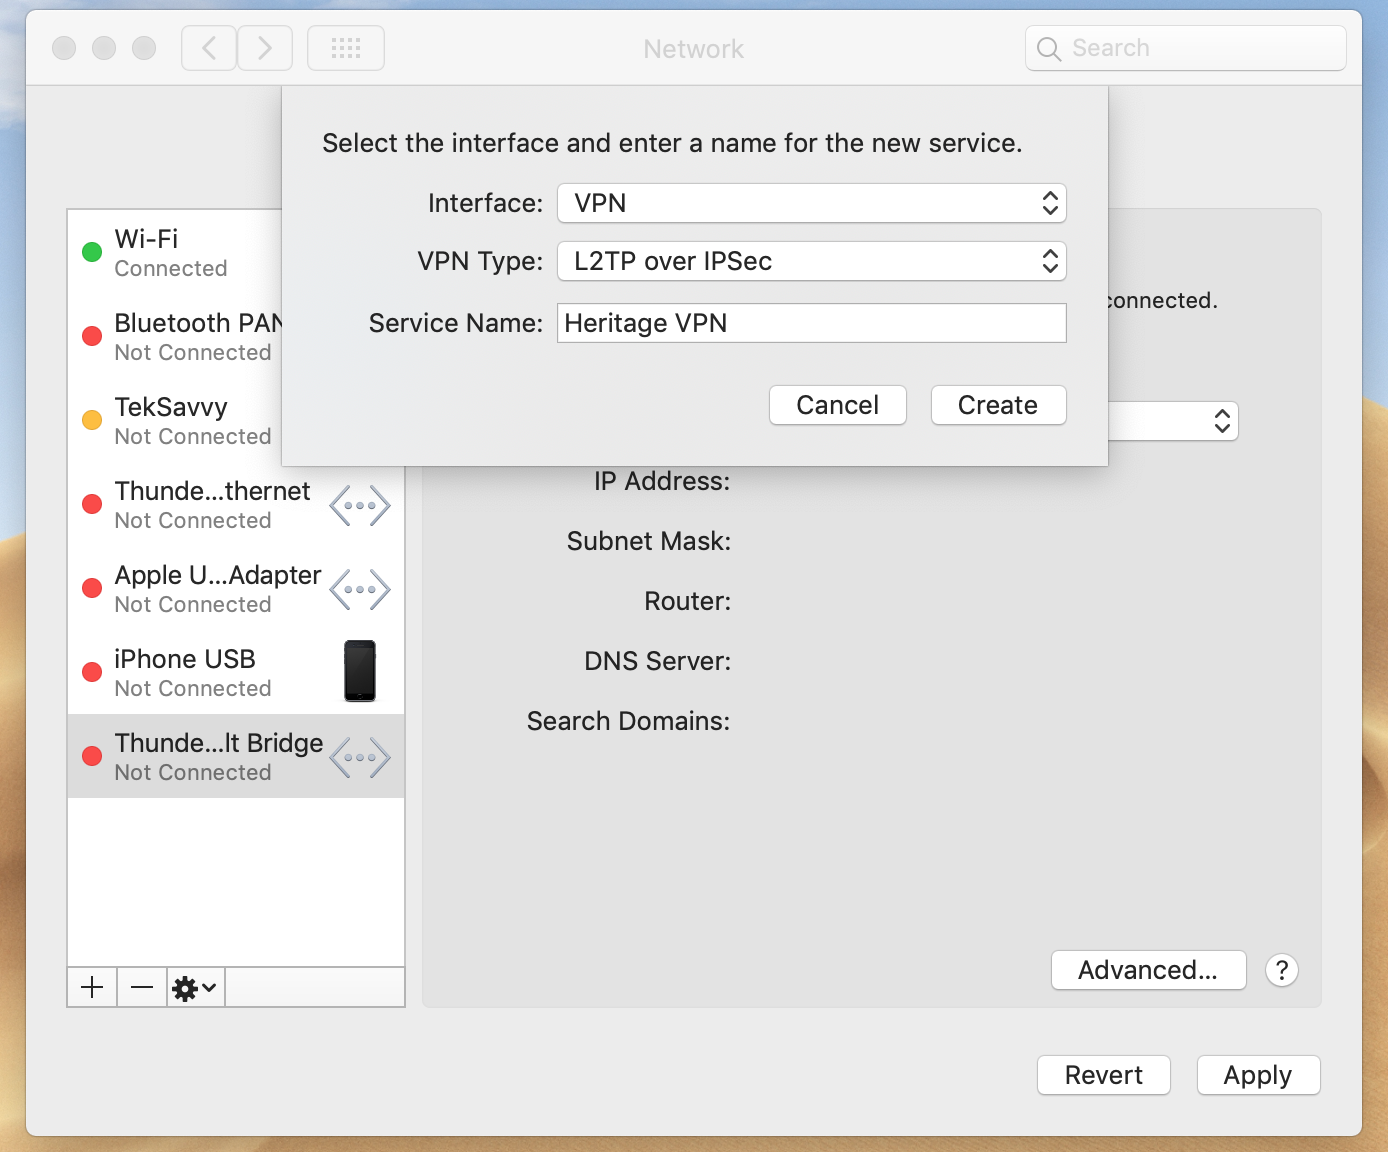
    • Currently Russ Shouldice. Questions regarding email set-up and myHeritage log-in.
    • Currently Matt Collins. Questions regarding classroom set-up.
  • HR: Currently Robin Antoine. Questions regarding contract.
  • Finances: Currently Shawn Goble. Questions regarding payroll set-up.

ADP Workforce Now Login

ADP Workforce Now is our new Human Resources tool. It’ll be our go-to tool for time sheet submissions, payroll information, vacation tracking, and more. You can access ADP Workforce Now in one of two ways. Login in using your Heritage ID or an ADP Workforce Now direct account.

Login using your Heritage ID

STEP 1: Login to Office 365

Login to the Heritage Office 365 portal using your Heritage ID* at office.heritagecs.edu. A link to this portal can also be found in the Helpdesk page of our website at discoverheritage.ca/helpdesk.

* Your Heritage ID is the same account as your Heritage email account, and the same account you might use to access a Heritage provided computer.

STEP 2: Open the ADP Workforce Now app

Once you’ve logged into the Heritage Office 365 portal, click on the All Apps button in the lower left.

Scroll down and look for the ADP Workforce Now icon. It’s red with the ADP logo in the middle. Clicking the app icon will open ADP Workforce Now.

Clicking on the app icon will automatically authenticate your Heritage ID and will open the ADP Workforce Now app.

Pro Tips

ADP Workforce Now is supported in desktop versions of Edge, Firefox, Chrome, and Safari.

Once you’ve accessed ADP Workforce Now through Office 365 at least once, the ADP Workforce Now app will now be available from the Waffle menu in the top-left of Office 365.

You can save a shortcut/bookmark to ADP Workforce Now by right-clicking the icon in Office 365 -> All Apps and choosing Copy Link from the context menu. Then just create a bookmark in your browser of choice and paste the link info into it. This way, you’ll be able to login directly without having to open Office 365 first.

Self-Guided Setup: MacBook

The laptop MUST be on the Heritage Staff wireless network for this process to work.  If you received the machine directly from the IT department, it will be.

Step 1: Login with your Heritage account

  • At the login screen click Other…
  • Enter your Heritage ID username (typically first initial + last name) and password
  • Press Enter
  • At the SecureToken prompt click Bypass

Step 2: Work through the Apple setup prompts

  • Please use the Apple ID assigned by the IT department when setup prompts you for an Apple ID.  This Apple ID will provide you with 200GB of iCloud storage for backups.  It will also associate the Mac hardware with this Apple ID.
  • You can still use a personal Apple ID for other Apple services such as iMessage and the App Store.

Step 3: Setup Heritage email

  • Open Outlook from Launcher or Spotlight
  • Click Get Started
  • Sign In to Outlook using your Heritage ID email address and password
  • Click Start Using Outlook
  • Click Add <username>@heritagecs.edu
  • Click Done

Step 4: Setup other applications

Feel free to launch and set up other applications such as…

  • OneDrive
  • Teams

Remotely accessing your computer from outside the Heritage network

There are times, where you may need to access your desktop computer from outside the Heritage network.  If you are in a role that requires you to use a desktop computer and do not have a Heritage-provided machine at home, use the steps below to create a Remote Desktop Connection to your computer in the office.

Remote Into Your Computer

First, create a VPN tunnel between your home computer and the Heritage Network.  Follow these steps to create the secure tunnel between your computer and the Heritage network BEFORE you attempt to open a Remote Desktop Connection.  The VPN connection will automatically time out after a while, so you will need to reconnect it each time you want to remotely access your computer.

Second, use Remote Desktop to access your computer using the instructions below.

Use Remote Desktop to connect to your computer – Windows 10

  1. Open Remote Desktop Connection.  Open the Start menu and search for “Remote Desktop Connection” (the word remote will typically suffice).  Open the app.  Then click Show Options.
  2. In the Computer field type the full name of the computer you want to connect to.  The full name of your computer is the name of your computer followed by heritagecollege.local.  For example, if Stu Pendous was trying to connect to his computer the full name would be
    spendous12b.heritagecollege.local

    To find out the name of your computer, please send a message to helpdesk@heritagecs.edu.

  3. In the User name field type in your fully qualified username, which in most cases will be your email address (the fully qualified user name for Stu Pendous would be spendous@heritagecs.edu). Press Connect or hit ENTER.  The connection will be established, this may take a moment.
  4. Enter your Heritage password.
  5. Confirm the security certificate by checking the checkbox and clicking Yes. This certificate is issued by the remote computer which is managed by the IT department at Heritage. The name in the certificate issued by the remote computer will be the name of the computer you’re connecting to.
  6. Once you press Yes in previous dialog, you should be logged in to your desktop computer that is on the Heritage network.  From there you can operate the computer as if you were sitting in front of it and you will have access to all the same resources.

Use Remote Desktop to connect to your computer – iOS and iPad OS

This tutorial will satisfy the need of users on the iPhone, iPad, and iPod Touch devices.  It was tested on iOS 11 but the methodology is the same even on older versions of iOS and iPad OS.

  1. Download and install the Microsoft Remote Desktop app from the iOS App Store.
  2. Open the newly installed app (it may appear as RD Client on your homescreen).
  3. In the Remote Desktop app press the + (plus) button in the top right.  Choose Desktop from the list of choices.
  4. In the Desktop dialog enter the following settings.
    1. In the PC Name type the full name of the computer you want to connect to.  The full name of your computer is the hostname followed by heritagecollege.local.  For example, if Stu Pendous was trying to connect to his computer the full name might be
      spendous12b.heritagecollege.local

      To find out the name of your computer, please send a message to helpdesk@heritagecs.edu.

    2. In the User Account field you can choose to enter your account information every time or to save it.  Please keep in mind who might have access to your iOS device and use that information to make a wise choice about saving your account information or not.  You will need to enter your full User Name and your Password.  For example, the User Name for Stu Pendous would be spendous@heritagecs.edu).
    3. Click Save.  This will save the remote desktop profile so can easily reuse it.
  5. Once the profile is saved simply touch on the profile to launch the remote session and access the remote computer.

Use Remote Desktop to connect to your computer – MacOS

These settings for iOS and iPad OS will also work for MacOS.  Simply install Microsoft Remote Desktop from the App Store, Add a PC configuration using the following settings, and connect.

  • PC name: The name of your desktop computer such as spendous12b.heritagecs.edu
  • User account: Use your Heritage email address and password
  • Click the Add button

Other Options

Others options to be aware of are things like copying files between your computer and the remote computer, or sharing audio or multiple displays.  To get to options click the small Show Options drop-down in the Remote Desktop Connection window.  Doing this will make five tabs appear along the top edge.  General, Display, Local Resources, Experience, and Advanced.

  • On the Display tab there are options for telling Remote Desktop how to handle multiple displays if you have multiple monitors plugged into the computer you are using to remotely access your computer at work.  You can also choose quality settings specifically.
  • The Local Resources tab is where you can affects settings related to the sharing of audio, printers, and the clipboard.  By default, the Clipboard is shared between your computer and the remote computer.  This enables you to copy and paste text between computer, and it will also allow you to copy files and folders between your computer and the remote computer (very handy).  Please note that sharing large files between computer could take a long time depending on the size of the file and the speed of your internet connection.
  • By default, audio is shared between computer, if you want to disable this go to the Local Resources tab and click on the Settings… button under Remote audio.  In the dialog box that appears choose Do not play under the Remote audio playback section and click OK.

Connecting to the Heritage Network using a VPN

VPN stands for Virtual Private Network.  In this tutorial we will discuss how to create a VPN connection to the Heritage network when you are off campus.  This can be useful if you want to access resources that are only available on-site such as the file server or a desktop computer.  Establishing a VPN connection between your computer and Heritage will create a secure tunnel where data can flow securely between your computer and the Heritage network.

Creating a VPN Connection

Windows 10

  1. Open the Start menu and choose Settings.  Look for and open Network & Internet
  2. From the Network & Internet sub-menu, choose VPN
  3. Click Add a VPN connection
  4. In the VPN Provider field choose Windows (built-in)
  5. In the Connection name field type a friendly name such as Heritage VPN
  6. In Server name or address field type
    vpn.heritagecs.edu
  7. In the VPN type field choose L2TP/IPsec with pre-shared key
  8. Enter the Pre-shared key into the Pre-shared key field.  The Pre-shared key can be found in the Heritage VPN Access email sent by a Heritage IT Admin.
  9. In the Username field type your full Heritage Username – this is likely your email address (such as anitaminute@heritagecs.edu).
  10. Type your Heritage Password into the Password field.
  11. Click Save to save the settings.
  12. The VPN connection is now configured.  To establish a VPN connection between your computer and Heritage simply choose the new connection and press Connect.

You can also access this connection extremely easily from the network icon in the Taskbar.  In the lower-right corner of the Taskbar, look for the network icon (it could be a wireless icon if you’re on Wi-Fi or a little Monitor-with-network-cable icon if you’re using a wired connection).  Click the icon.  If you completed the steps above to create a VPN connection, the new connection will be available from this menu.  Just click it a choose Connect.

iOS

Creating a VPN connection profile is easy to do on iOS and provide a secure tunnel from your device into the Heritage network.

  1. Open  the Settings app.
  2. Go to General -> VPN.  You’ll need to scroll down as its near the bottom.
  3. Choose Add VPN Configuration…
  4. In the Add Configuration screen for Type choose L2TP
  5. In the Description field type a friendly name such as Heritage VPN
  6. In Server field type
    vpn.heritagecs.edu
  7. In the Account field type your Heritage Username – this is likely your email
  8. Type your Heritage Password into the Password field.
  9. In the Secret field, very carefully, type in the Secret code.  Contact the IT department for this code.
  10. Choose Done at the top right.
  11. The VPN connection is now configured and you will move back to the VPN screen.  To test the connection click the slider to the right of Status.  The connection will be established and the status will change to say Connected.

Additionally, now that the VPN settings are configured you can turn the connection on and off easily from the main Settings App screen.  A new entry called VPN will have appeared near the top.

MacOS

Creating a VPN connection profile is easy to do on iOS and provide a secure tunnel from your device into the Heritage network.

  1. Open  the System Preferences app
  2. Go to Network.  Click the + (plus) button in the lower left-hand corner of the Network window to add a new connection
  3. In the Interface drop-down choose VPN
  4. In the VPN Type drop-down L2TP over IPSec
  5. In the Service Name field type a friendly name such as Heritage VPN.  Click Create
  6. In Server Address field type
    vpn.heritagecs.edu
  7. In the Account Name field type your Heritage Username – this is likely your email
  8. Click the Authentication Settings button.  Type your Heritage Password into the Password field
  9. In the Shared Secret field, very carefully, type in the Secret code.  Contact the IT department for this code.  Click OK
  10. Choose Apply in the bottom right
  11. The VPN connection is now configured.  To initiate the connection between your Mac and the Heritage campus click the Connect button.  You may also choose to enable the Show VPN status in the menu bar to provide a quick and easy place to initiate the connection.  With this enabled, you can simply click Connect Heritage VPN to make the connection.

Other Awesome Stuff

Now that you’ve established a VPN connection you can do awesome stuff like remotely access your desktop computer as if you were sitting in the office at Heritage.

If you have a Heritage-deployed laptop, after establishing the VPN connection, you should be able to access your Home drive and the Staff drive like you normally would by going through File Explorer and opening those drives.  Please note that opening those network locations will be slower over the VPN connection than when you are physically on-site.

Getting started with Microsoft OneDrive

First off, what is OneDrive?

OneDrive is a cloud based program, hosted by Microsoft. It is apart of our Office 365 subscription and is therefore easily able to integrate into our workflows.

How to Upload Your Files onto OneDrive for Work at Home

With the current state of health in the world, we all must proceed forward in a manner that allows us to access tools and files and produce work from home. OneDrive is going to be a key component in allowing us to do so. Whether accessing OneDrive from your browser or from an app downloaded on your device, you now have the freedom to transfer and access work files simply over OneDrive. This will grant you access to these files from virtually anywhere and thus alleviate the necessity for coming in to work. This article will cover the two ways of doing that, through the app and/or through your web browser.

How to Access OneDrive in the Cloud

Because OneDrive is cloud-based, files and folders stored there can be accessed from almost any device with a modern web browser.  All modern web browsers including Google Chrome, Mozilla Firefox, Microsoft Edge, Apple Safari, and many more can be used to login to and access files stored in OneDrive.

To access OneDrive navigate to http://office.heritagecs.edu and login with your Heritage email address and password.  After logging in click on the OneDrive icon in the Good morning section.

(click the image to see a larger version)

Create new files and folders

  • To create a folder, click the + New button in the border located at the top of the page.  Then click Folder.
  • Once you create and name your folder/s you can then upload files onto them from your computer.
  • To do this, simply drag and drop a file from your computer onto the main area in the browser.  The file will be uploading into that folder.

(click the images to see a larger version)

Share a files and folders

  • To share a folder, hover your mouse over it and a translucent circular button will appear to the left, click it and a blue check mark will appear inside.
  • From there, direct your attention back up to the border where you previously selected “+ New” you will see a “Share” option in its place.  the Sharing menu will pop open.
  • Select “anyone with the link can edit” and write down the name of the staff and/or faculty member that you would like to share the contents of that folder with.
  • You can send an email directly to the person you’d like to share with by entering their email address and clicking Send.
  • Or, you can click the Copy Link button and paste the link into an email, or use it elsewhere.

How to Use the OneDrive App

An alternate way to access the uses of OneDrive is to download the OneDrive app onto your computer. For Windows10 users, it should be on your computer already. If not, you can find the download link for OneDrive by locating the “Get the OneDrive Apps” link by logging in to OneDrive using your browser.  Again, the link to OneDrive is http://office.heritagecs.edu

  • Once on your computer, open the app and it will ask you for your email.  Search for it in the start menu if needed.
  • Use your corporate Heritage email address and proceed to login.
  • From there, OneDrive will go over the process for you and explain how to use the app.  Make note of the location of the OneDrive folder, and some new icons for the status of files.
  • OneDrive will sync any files and folders you add into the OneDrive folder on your computer to the cloud.  These files  and folders will be accessible across all devices because including the app on your phone and in the browser.
  • If you wish to share files simply folder the instructions above on sharing files and folders.  Alternatively, simply right-click on a file and choose ‘Share’.  This will give you a dialog similar to the online version of the sharing menu.

Welcome to Heritage College and Seminary

Hey there, welcome aboard!  As you already know, we’re pretty excited to have you join the team here at Heritage.  And we have high hopes about your partnership in our continuing mission to equip men and women for life and ministry.  Here are a few things that will help you get started.

Accounts

You have a Heritage ID account and a myHeritage account.  They are two different things.  I know, we were very original about the naming of these accounts.

  • Heritage ID – This is the account that is tied to your email and will grant you access to most computers on campus.  It is made up of the username/email and password that you were given by your manager when you started.  It will also grant you access to a number of systems; office computers, your email, Microsoft Office 365, Microsoft OneDrive, Microsoft Teams, printers, ADP Workforce Now, etc.
  • myHeritage account – myHeritage (the developer is Populi) is the system that keeps track of our student records, handles course and program details, manages student billing and donations, and is also a learning management system.

Wireless Access

There are two wireless networks available on-campus.  The first is a public access network for use by our students and guests for general access to the internet.  The second is our secured network for use by our staff and faculty that provides direct access to our server infrastructure and faster upload speeds.  Details are below.

  • Name: Heritage. Open network, needs no password.
  • Name: Heritage Staff. Closed network.  See the IT Manager for access.

Other Apps & Tools

  • Office 365 is a set of cloud-based apps and tools that enable us to communicate, write, organize, and manage.  Login to Office 365 by using the URL office.heritagecs.edu.
  • Microsoft OneDrive is personal cloud storage that’s included as an App within your school Office 365.  Navigate to office.heritagecs.edu and login with your Heritage ID.  OneDrive provides you with 1TB of cloud storage and can be setup to synchronize files between your computer and the cloud.
  • Microsoft Teams is an excellent video conference and collaboration solution.  We use Microsoft Teams for inter-office chat and team collaboration on projects.  We also use Teams as a video conference tools for meetings and to delivery our live streaming courses.  There are Windows 10, MacOS, iOS and Android apps for both OneDrive and Teams.  You can access Teams directly from teams.microsoft.com or by logging into Office 365 (above) and clicking the Teams icon.
  • Your Home drive.  When you login to a Windows-based computer, your home drive will automatically mount.  The H: drive is a spot on the server where you can store your own personal files that only you have access to.  In some cases, the primary Documents, Desktop, Photos, etc. directories point to these same folders on the server.  Access to your Home drive can be setup for MacOS users with a quick trip to see the IT Manager.
  • File storage and collaboration is handled by our file servers.  One of the main locations for this is the Staff Drive, which will be mounted automatically when you log in to a Windows-based computer.  For Mac users, please see the IT Manager to get set up.
  • Heritage VPN – this tools provides a way to connect back to the Heritage campus network when you’re off-site.  If you have a Heritage laptop, chances are the VPN configuration is already complete.  All you need to do connect using your Heritage ID.  Feel free to check out the article on Connecting to the Heritage Network using a VPN for more details.

If you need tech support, please email rshouldice@heritagecs.edu or message me on Microsoft Teams.

Our Website (Outlook & Helpdesk)

There are a few easter eggs on our website that act as quick links to important locations.  So, head over to discoverheritage.ca and check out these links.

  • Outlook & Helpdesk – links to these two locations can be found in the footer of the website.  Just head to discoverheritage.ca and scroll all the way to the bottom.  Outlook is a web-based version of Outlook where you can access your Heritage email.  Helpdesk is a page that provides a useful jumping off point to the most important Apps & Tools, including to this Helpdesk site (Salo).
  • myHeritage, Moodle, and Live –  These three links live in the header of every page.  They are located there because they are the most high traffic and timely links that folks look for.

Articles

These are useful articles on how to add an email account to a Smartphone (if desired) and how to connect to a printer from any of the Windows 10 workstations.  MacOS users, please see the IT Manager.