MyHeritage Part 5: Setting Up Assignments and the Grade Book

Setting Up Assignments

NB: If you are teaching Section 1 and Section 23 courses, ensure your two sections are synched before you set up your grade book. Instructions for how to do so can be found by scrolling down here, under Settings.

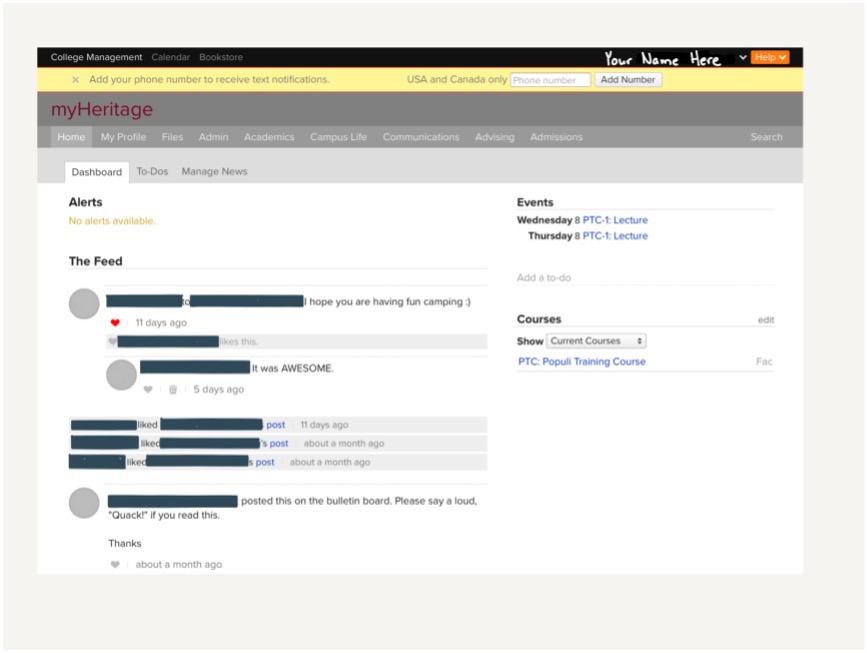
It is through the Assignments tab that you will generate your grade book, and through the Gradebook tab that you will enter the grades. The grades entered here are automatically made available to the students, so they can easily follow their academic progress in your course. Further, students who are struggling academically will be flagged for faculty advisors to follow up, ensuring that students don’t slip between the cracks. 

Grade book setup begins in the Assignments tab. This is approximately what it looks like when you first open it:

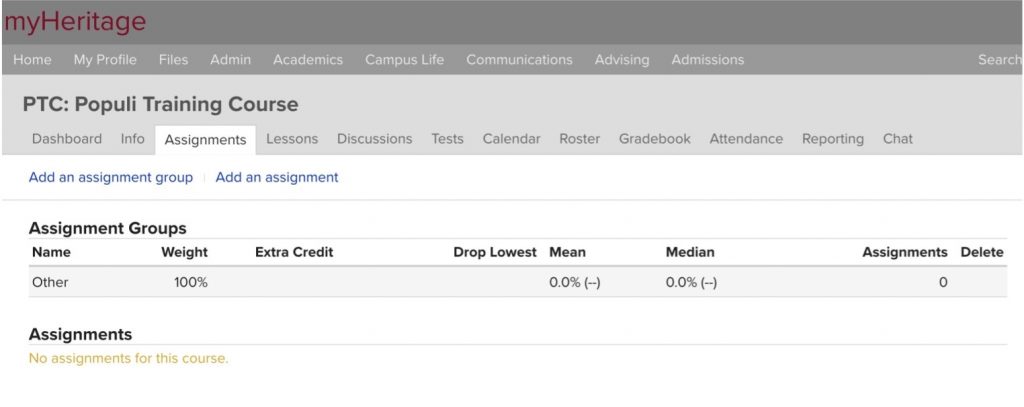
First, you will need to add assignment groups, and then assignments into those groups.

Let’s say on your syllabus, you have the following assignments listed, which make up your final grade:

  • Reading and Participation: 15% of the grade. Each class, you do a reading check out of 10, for a total of 12 reading checks/participation grades.
  • Quizzes: 15% of the grade. Every other week, there is a quiz out of 10 marks, for a total of 6 quizzes.
  • A research essay: 25% of the grade.
  • A mid-term exam: 20% of the grade.
  • A final exam: 25% of the grade.

Assignment groups establish the overall weight of the type of assignment toward the final grade. So, each of the bullet points above will need its own assignment group (even if there is only one assignment in the group, like the essay, mid-term, and final term). Click on the “Add Assignment Group” button, and you will get a little pop-up, like this:

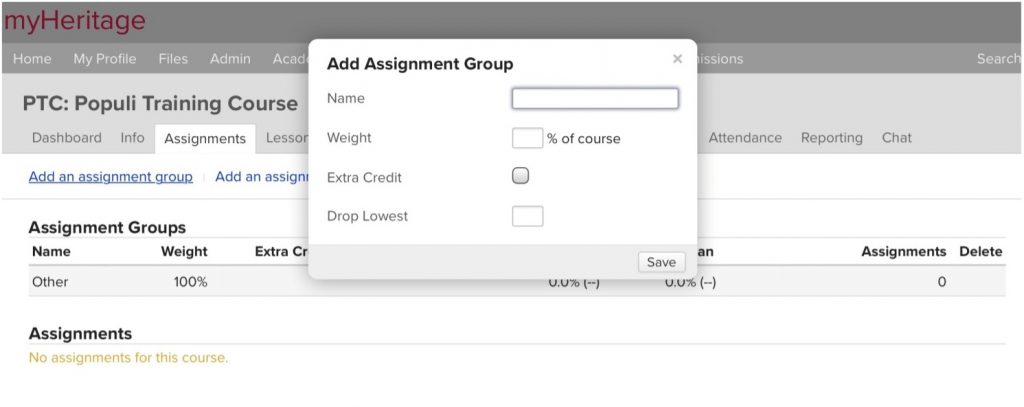
Type in the name of your assignment group (Reading, Quizzes, Essay, Mid-term, and Final, for example), indicate how much of the final grade it is worth, and, if you want to drop the lowest couple of grades of a large category (say the lowest result of the 12 grades for reading), add that, as well. Then click “save”. You will do the same for each of the groups you need.

Once you have all your assignment groups listed, with their weight, you need to add assignments into those groups. Click the “Add assignment” button, and you will get this pop-up box:

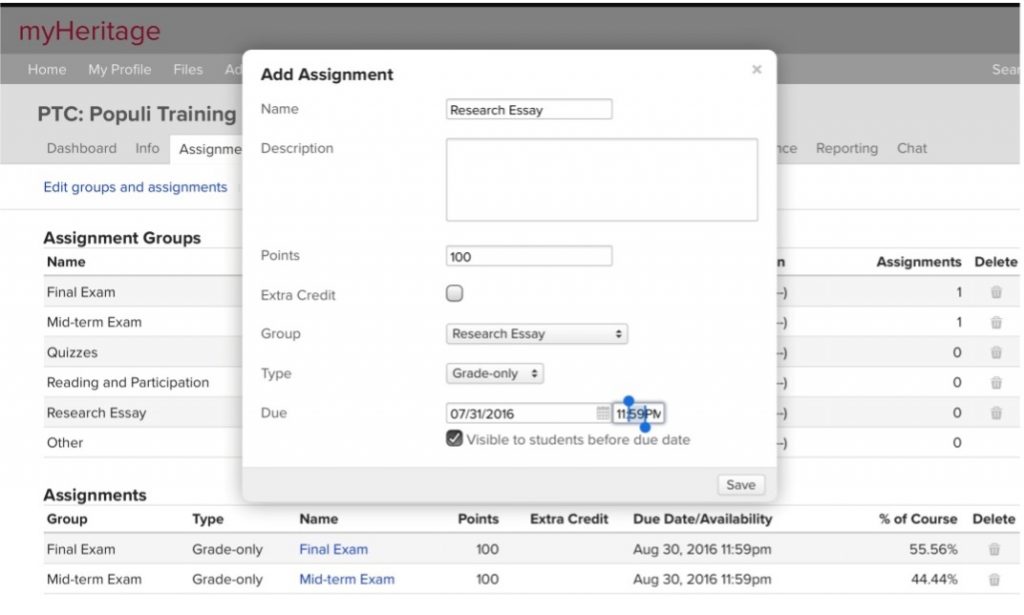
  1. Name the assignment. If there is only one assignment in the group (such as the research essay) the assignment can have the same name as the group. If there are multiple assignments within that group (such as 6 quizzes), each assignment needs a unique name (Quiz #1, for example).
  2. Select the assignment type. The major types are as follows.
    • A grade-only assignment means that students will submit an assignment to you outside of myHeritage (such as a paper copy of an essay or a paper quiz written in class), which you will grade and enter only the grade. If you are not confident using myHeritage and rely on paper submissions (which is perfectly ok!) this is the type of assignment you will want to use.
    • A file assignment means that students will submit the paper electronically on myHeritage.
    • An essay assignment means that the students will write the essay on myHeritage. This assignment type is best suited to short essays that do not require footnotes. You can create rubrics to use to grade the assignment on myHeritage.
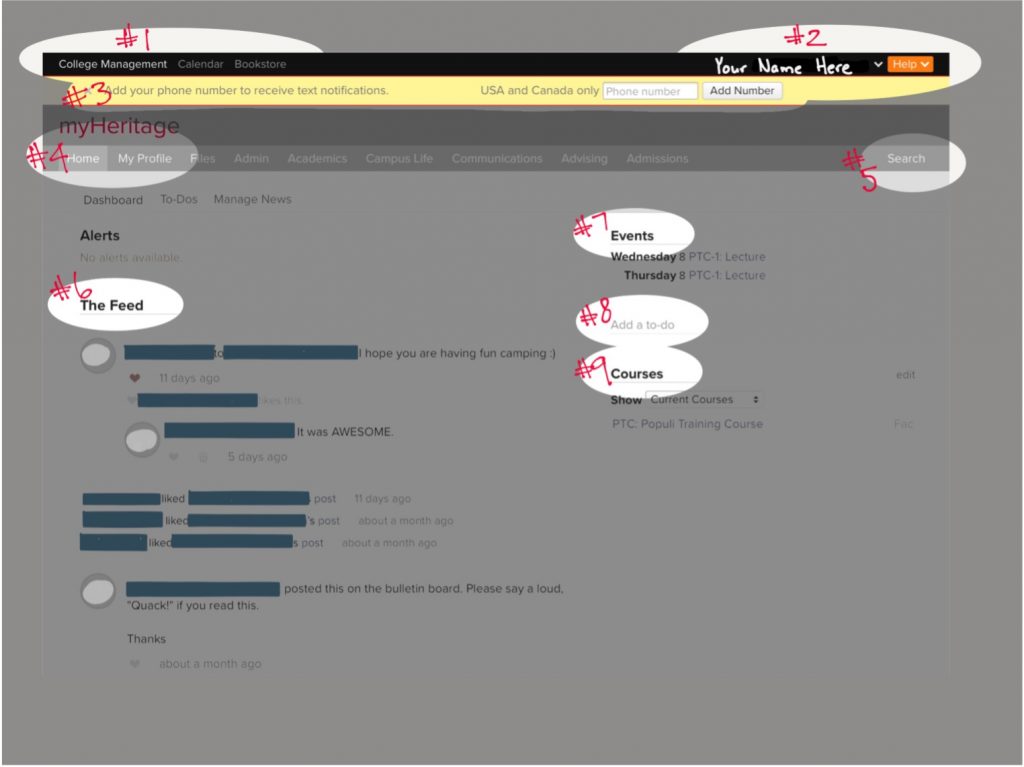
    • A test assignment will generate an automatic online test which will then need to be populated with questions. If you use a lot of quizzes or you have multiple-choice type exams, myHeritage can do a lot of the grading for you if you use this type of assignment. If you would like further instruction in setting up and using the Tests feature of myHeritage, please see here.
  3. Set the points for which the assignment is worth. This is not the weight of the assignment, but what you will grade the assignment out of. Be aware that if you have multiple assignments within a group (like 6 quizzes worth a total of 15% of the overall mark), you need to set the points equal for each of those types, otherwise the assignment with the higher number of points will have more weight toward the final grade. Also be aware that if your assignment type is “test”, the points for which you set this assignment will be the number of points which you need to assign in the online quiz. For grade-only assignments, files, and essays, it is fine to set all points to 100 and then enter the grade as the percentage rather than whatever raw score you give.
  4. Select the group in which the assignment will be found. Remember, some groups may have only one assignment.
  5. Set the date when the assignment is due. This will automatically generate reminders to place in your and your students’ calendars.

All done! Hit “save” and repeat for every assignment students will complete. You will notice that the website automatically adjusts the relative value of each assignment, based on what groups you have set up, and how many assignments are in each of those groups.

Entering Grades in the Grade Book

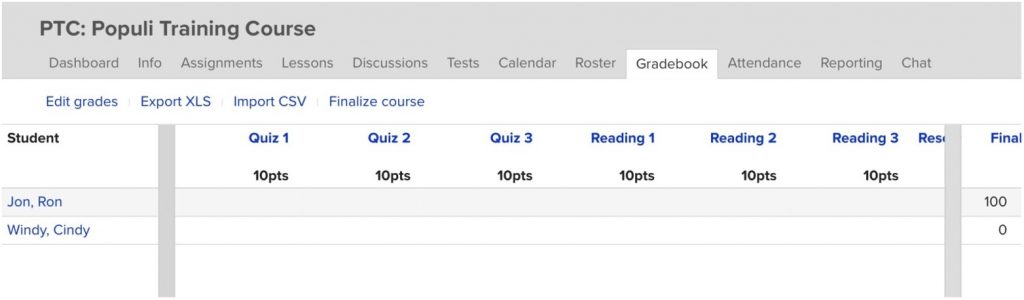
If you click on the Grade Book tab, you will now find a spreadsheet with each assignment and each student in your class listed. It will look like this:

To enter grades, simply click the “Edit grades button”. The grade book will go live:

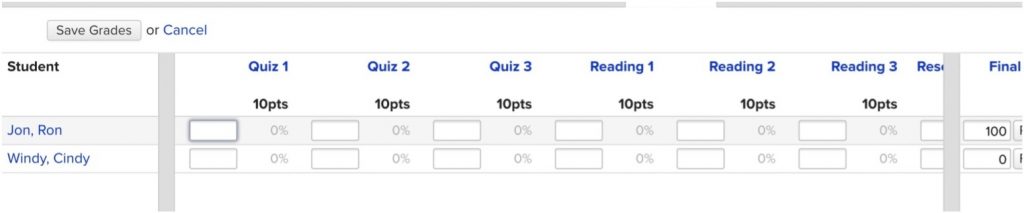
You can now enter the grades, and myHeritage will calculate the percentages and apply the grades toward the final grade for the course. If you have entered grade-only assignments with each out of 100, you will enter grades here as a percentage rather than as a raw score. If a student has failed to complete the assignment, enter a grade of 0. You must not leave spaces blank or the final grade will not be accurate. Click “Save Grades” when you are finished. Students can now view their grades.

If you have Section 1 and Section 23 students, use the drop-down menu in the upper-right corner of the page to select the next section, and repeat.

If, at the end of the semester, you wish to override a final grade, you are able to do so. For example, if a student has received a grade of 48%, but you wish to allow that student to pass, you can override the 48% and give the student 50% by clicking “Edit grades” and simply overwriting the final grade.

Further, at the end of the semester, when all your grades are in and attendance records are accurate, use the “Finalise course” button to submit your grades to the registrar’s office.

Next: Part 6: Using the Tests Feature

MyHeritage Part 4: Taking Attendance

Heritage requires all professors to take weekly attendance for their classes. In the past, this was done by filling out weekly attendance sheets and submitting them to the office. Now, attendance will be taken through myHeritage, enabling students to keep careful track of their own attendance, and making the information instantly available to all who require it. Heritage is required by law to keep accurate and up-to-date attendance records so that we can provide OSAP funding, so we appreciate your diligence in this matter.

Click on the “Attendance” tab. A calendar like this one will open up.

You will notice that your class times are all listed. When you click on the class for that day, you will get an attendance list for your class roster.

MyHeritage automatically sets attendance to “Present”. If your whole class was present, click “Save Attendance”, and you’re done. Otherwise, find those students who were not present and select “Absent”.  Be sure to take attendance for both Section 1 and 23 students by toggling the section drop-down menu in the upper right corner of the page.

If you have a student who is normally in class, but was present online instead (or vice versa) you can mark that student as present and make note of the online status in the notes box beside the student’s name. Please note that although there is a category for Tardy, Heritage does not collect that information. Students must be marked as either present or absent. If students are substantially late, or if they are present for only part of the class, you can make note of that in the “notes” section of the attendance page.

When you have saved attendance for that class, you will notice on the calendar that the class changes colour. You can see at a glance which classes you have taken attendance for.

Attendance records for each student are instantly updated, and students can quickly check their attendance records for each class. In addition, frequent or repeated absences will be quickly flagged and faculty advisors will be notified for early intervention.

Next: Part 5: Setting Up Assignments and Gradebook

MyHeritage Part 3: Academics

This page introduces you to the course page. If you are looking for information on taking attendance or setting up assignments and grade book, please visit those pages directly. Otherwise, keep reading.

For faculty members, the course page is the heart and soul of myHeritage. You are expected to use the academics section at least to maintain an online grade book for each of your classes, and to take weekly attendance for each of your classes, but the learning platform will also allow you to upload notes, create lessons, post discussions, communicate updates, and even administer automatically-graded tests.  This section will introduce the course page of myHeritage, and explain to you how to set up a grade book and take attendance. 

Courses are accessed on your home page (see Introducing the Home Page #9). The automatic view is for the current semester, but you can click on the drop-down menu under Courses to select an alternate semester.

  1. Set a profile picture for your course by clicking on the photo and choosing “Click to Edit”. You can upload a photo of one of your course textbooks or another suitable image.
  2. These two drop-down menus tell you which course you’re looking at. They are automatically set to the most recent iteration of the course and Section 1 (on-campus). If you are teaching an on-campus class, you will probably also have online students (Section 23). You can use this drop-down menu at any point to toggle between the two sections of the same class.
  3. The tabs across the top allow you to generate group emails or texts.
  4. The tabs down the left side of the screen bring you to the various sections of your course.

Dashboard

When you click the course link, you visit the course dashboard. It contains the Bulletin Board for this course, which is visible only to the faculty and students enrolled in this course. The Bulletin Board is an effective way to make class announcements or send out reminders to your students, or for your students to ask you questions or make comments. Bulletin board posts are visible only here on the course dashboard.

The Dashboard also lists any upcoming events and due dates (if you use the calendar).

Syllabus

This page is automatically generated and should be edited only in limited fashion.

  1. Course Info and Faculty includes course code, term, and credit hours. This is automatically generated and cannot be edited. Phone numbers beside the faculty name are not visible to students.
  2. The description is entered by the registrar’s office and cannot be edited. The course description on your syllabus must match the description listed here. This is the broad description of the course as it needs to be taught to help meet the program objectives and the mission of the school.
  3. Assignment Groups is automatically generated as you enter assignments in the Assignments tab.
  4. Syllabus. Your syllabus will be uploaded by the registrar’s office once it has been submitted, checked, and approved. Please DO NOT upload your own version of the syllabus unless it has been checked and approved. Syllabi cannot be changed after the beginning of the term.
  5. Links are added by the registrar’s office. You may add links to this section, but do not delete or change any that are already there.
  6. Reading List is automatically generated by the bookstore. Check that the books listed are correct, and if they are not, please report the error to the registrar’s office. Please do not make any changes to the books listed.
  7. Files are added by the registrar’s office. They include course change forms, proctor forms, and a copy of the Heritage Manual of Style. You may add files to this section, but do not change or delete anything already there.

Lessons

The lessons section of myHeritage allows you to organise your assignments and the content of your class into weekly sections. Simply use the “Add a Lesson” button on the right to create a lesson. You can then name it and set availability and click save. From there, you can add headings and text, upload files such as class notes for that lesson, include links, create discussions, and include assignments and tests. (Note: you must create assignments and tests first under the Assignments tab.) Using the Lessons feature is a fantastic way to help students stay organised or, for on-campus and live-streaming students, to upload video lectures in case of snow days or other missed days.

Files, Discussions, and Calendar

Files is a centralised list of all the files that are uploaded to your course, including the syllabus, course change forms, and the Heritage Manual of Style. If you do not set up lessons and assign files to individual lessons, you can still upload class notes here, to allow your students access to the notes.

Discussions are a great way to get students to interact with each other and the material you are teaching. You will pose a question to which students respond. They can then also respond to each other. The Discussions tab is a centralised list of all the discussions that are generated in your course. If you do not set up lessons and assign discussions to specific lessons, you can still generate discussions here.

The Calendar will show at a glance when you have classes and what assignments are due on which days.

Settings

Most of the items under the settings tab are automatically generated and cannot be changed. However, if you are teaching on-campus (Section 1) and live-streamed (Section 23) students, before you set up a new course, you should scroll to the bottom of the settings page and click the “sync” setting to “yes” for both sections of your class. This will mean that any changes you make to one section (such as setting up assignments, lessons, and discussions, or adding files and links) will automatically be made to the second section. Sync will not affect the entering of attendance or grades or posts to the discussion board. Those areas will still operate independently.

Next: Part 4: Taking Attendance

MyHeritage Part 2: My Profile

Your profile can be accessed by clicking on the “My Profile” tab or by clicking on your profile picture in the upper right corner and selecting “Profile” from the drop-down menu.

  1. Your profile picture. Please take or upload a clear head photo of yourself. You can do this by clicking on the photo and selecting the “click to edit” button at the bottom of the box. Then choose “change” and drag and drop or select a photo of your choosing. If you need help doing this, please email a suitable photo to the registrar so that the photo can be uploaded for you.
  2. Tabs. Depending on your role at Heritage, you will see some of these tabs. Further explanation of some of the tabs will be given below.
  3. Contact information. You can use these links to email any myHeritage user.

Activity Feed

Your profile opens automatically to the Activity Feed, which is an automatically generated list of all notes, emails sent to you or sent by you via myHeritage, text messages sent to you or by you via myHeritage, letters, files, forms, and to-do items created by you or assigned to you via myHeritage. You can use the drop-down filters to find items in that list. The activity feed is helpful when trying to find correspondence with a student, for example, but otherwise won’t be something you use frequently.

Bulletin Board

This is the social media section of myHeritage, but it is rarely (if ever) used. It is an internal social media site, so anything you post here will be visible only to other myHeritage users.

Info

The info tab contains information such as your address and email address, spouse’s name (if applicable), and home church. By going to a student’s profile page, you will be able to see those details about a student. This information is entered by school administrators and you are not able to edit it. If you see any errors in your own information, please contact the Heritage front office to have the corrections made.

Please note that the information visible to you is not visible to students. Students can only contact you through myHeritage, and we request that you do not give out any email other than your Heritage email or any personal phone number.

Go to “Part 3 – Academics”.

MyHeritage Part 1: Introducing the Home Page

When you log on to myHeritage, you are on the “Home” page. It looks something like this, although your page may show a more updated version of myHeritage and fewer tabs. The photos will still help you to navigate the site.

  1. Main Menu: These tabs bring you to the main areas of myHeritage. Home is where you will be spending most of your time. Files will give you access to things like minutes and handbooks, depending on privacy settings. You can check the Institutional Calendar by clicking on the Calendar tab, and you can order textbooks and buy Heritage swag from the bookstore.
  2. Your profile picture: If you click on the down arrow, you will find a drop-down menu that allows you to edit your profile, change your settings, or log out. The settings tab gives you control over things such as your email signature, your privacy settings, and whether your birthday is publicly announced (the default is that it will be announced).
  3. You can enter your phone number here if you wish to receive text notifications. You can also enter your phone number under the settings tab found by your name. If you have already entered a phone number for text notifications, this banner will not appear. This phone number will not appear publicly. Texts will come from Populi, not directly from whoever is texting you.
  4. Navigational Tabs: The number and type of tabs you have here will differ depending on your role at Heritage and on what section of the main menu you are in.  The Home tab will always bring you back to this startup page.
  5. Search: By using this feature, you can search for any myHeritage user, including faculty, staff, administration, alumni, and students. You will be able to access all public information about that user. The search feature has been moved to beside your profile picture in recent updates of myHeritage.
  6. The Feed: This is an automatically-generated internal (as in, available only to myHeritage users) social media feed that allows students and profs to communicate in an informal way. You can follow people and be followed, and when the people you follow post updates, their stories will appear here in your Feed.
  7. Events: This is an automatically-generated list of events from your calendar. More details on how to use this feature can be found under the “Academics” section.
  8. To-Do: Your to-do list will contain items that you have set for yourself to do, and items that others have assigned for you to do. To add your own items, click on “Add items” and fill in the pop-up box. You can add items for other people to do by switching the “assigned to” from “me” to “someone else” and then typing in that person’s name.
  9. Courses: This is an automatically-generated list of the courses you are teaching for each semester. You can change the semester by clicking on the “show” tab, and selecting the semester you wish to see. Each course listed is a live link which will bring you to that course’s page.

Go to “Part 2: My Profile”.

Digital Theological Library 2

Heritage Theological Seminary is pleased to announce that we now have access to the Digital Theological Library 2.  This massive set of digital resources is now available to seminary students, faculty, and staff.  The collection contains over 478,000 books (including more than 50,000 books from the past 5 years!), over 10 million peer-reviewed articles, and over 34,000 journals.

Access is available immediately.  Go to the Digital Theological Library 2

To access a resource, simply search the catalog.  When you click the View button to see a resource simply select Heritage from the School drop-down and enter your myHeritage Person ID as the Barcode (how to identify your Person ID).  For a more detailed walk-through of the database, please check out the How To Use article.

Collection highlights include:

For support, please contact support@heritagecs.edu.

Using myHeritage for Online Lessons

Log on to your course page on myHeritage. This is the same place you take attendance and enter grades. Along the left side is a column reading Dashboard, Syllabus, Files, Assignments, Lessons, Discussions, Tests, Calendar, Gradebook, etc. (See #1 in photo below.)

Create A Lesson

(all photos are from Marianne’s Intro to Children’s Ministry class)

  • Click on the Lesson tab. You will see this (click image for large version):

(click image to enlarge)

  • Click on the Add a Lesson tab. (See #2 in the photo above.)

(click image to enlarge)

  • Give the lesson a title and set the date and time it will be available (generally the time your class would normally start). If you click “after the previous lesson is completed”, that will override any date and time you make the lesson available. I usually leave it unchecked.
  • Add one lesson for each class you have left in your semester. You will see them appear as a list, as you can see in the first photo.
  • To give your lesson content, click on one of the lessons you have just created. It will open up to two tabs, as seen below:

(click image to enlarge)

My lesson already has content. Yours will be blank. The “view” tab (#5) is how the lesson will look to your students. The “design” tab (#4) is where you will add the content. Click it. Photo is on the next page. I don’t have time for fancy formatting!

(click image to enlarge)

Again, my lesson already has some content. But you will see the line at the bottom, #6.

A heading is just that. A text box will open up and you can type directly in it, and on the view tab, you’ll have a nice, bold heading.

Content is like what you see at the top of my lesson to the left. Again, a text box will open up. You can type in it directly to give the students directions, information, whatever. I think you can even add photos to that content. The text is fully formattable. (You can underline, highlight, use italics, bold, etc.)

Discussions allow you to post a topic and have students interact with that topic and with each other. I’ll talk more about that below.

Files are your Powerpoint slides (I always save them to PDF and upload the PDF) and your audio or video files. I’ll talk about that more below.

Link allows you post a link to a website or YouTube video. More below.

Lesson Content Types

Discussions

Discussions are helpful ways to get students to interact with the material and each other in lieu of face-to-face interaction. Add a discussion and this box will open up. Give your discussion a catchy title, and then in the topic box create something for students to talk about. You can also drag and drop files or photos for students to interact with.

  • Beside Published, click yes.
  • Beside available, click the date of your class.
  • Beside Comments closed, click no.

Peer rating means that students can evaluate their peers’ comments. I don’t find it helpful, but to each his or her own.

Post first means that students must first reply themselves to the topic posted before they can see their peers’ posts. This is helpful to ensure originality of ideas.

Max comments and max replies are helpful if you have a student who posts dozens of times. As if. I usually leave these blank.

Allow students to add to the discussion: I usually click no. Probably because I’m a control freak. Mostly because I don’t know what it means. It’s never hindered my discussions online.

Require students to participate in the discussion. It is important that you click “yes” for this. It is the only way we can track participation for attendance.

Files

This is what you will use to upload lecture notes (Powerpoint) and audio or video recordings.

I always save my Powerpoint slides as a PDF and upload the PDF.

Drag and drop the files you want to upload.

Hide file from students: No. What would be the point?

Show embedded preview player: Yes. This allows the students easy access to the files.

Require students to view or download? Yes. Again, it is how we will measure lesson completion for attendance records.

Links 

If you add a link, this box will open. You can give the link a title, and then copy and paste the URL (website). The students will see the title as a hyperlink.

Again, if you use a link, require the students to click it for attendance purposes.

Conclusion

Ok, that’s your lesson. Now go back to the very first photo, and have a look at #3.  If you click on that, you will see a graph that looks like this:

(click image to enlarge)

Each lesson will have a status bar showing how much of the lesson has been completed (if you’ve required all the elements to be done). If the student has completed the whole lesson, you can then mark that student as “present” in the attendance tab. If a student has not completed the lesson (or hasn’t completed enough of the lesson), you can mark that student as absent. You may notice that myHeritage now has a “notes” section beside each student’s name on the attendance roster. If a student is finished part but not all of the lesson, you could mark that student present and make a note of how much of the lesson was complete. If the student then has another lesson that is only partly completed, you could make that note and mark the student as absent the second time.

Posting audio or video content to a course in myHeritage

  1. Login to myHeritage and navigate to your course (either under Academics -> Academic Term -> Courses or by going to My Profile -> Faculty) by clicking on the course name. The course Syllabus page will appear.
  2. Choose Lessons from the menu on the left.
  3. Choose a Lesson (if there are no Lessons in the course, click the Add a Lesson button on the right).
  4. From the Lesson view there are two tabs, View and Design. Choose the Design tab.
  5. From the Design tab you have the ability to Add a section. Click the small link that says File to add a media file.
  6. Drag and drop the media file into the upload area that appears or click the area to choose a file.
  7. Once the file has completed uploading, click the Save

Please see the How To Embed Audio, Video, And Other Kinds of Files In A Lesson article on the Populi Knowledgebase for similar instructions and further details.

Note: To view the newly uploaded file like a student would see it, go back to the View tab (from Design).  When you are uploading the file you also have options to Hide the file or use the media player built in to myHeritage (strongly recommended).  Also, there is a file size limit of 4GB per file.

Communicating With Other Students Using myHeritage

Question: Can we make personal contact information available to others?

Yes.  In your own profile, on the Info tab, each piece of contact info (such as an email address or phone number) can be marked as private or not.  Click the little lock icon to make an item public.  An item is by default not public.  Please see this support article for more details.  https://support.populiweb.com/hc/en-us/articles/223792047-My-Profile

Question: Can I find contact information for other students and send them a message directly?

Sort of. Heritage does not publish lists of contact info as this would be a breach of privacy.  However, you may contact a student directly who has made their contact info public.  See the answer to the above question for details on making contact info public.

Additionally, you can communicate with other students in your class by posting a comment on their bulletin board or contacting them directly using their public contact info.  To view the roster for your class, navigate to the class and click on the Roster tab.

Question: How about group discussions?

Yep.  myHeritage ships with a Discussion function with a per class scope.  Students can create discussions to facilitate communication with other students in a given class using a group discussion format.  To create a discussion navigate to the class, click the Discussions tab and click Add a Course Discussion.