Registering for Courses

You can register for courses when the Registrar’s Office has set up online enrollment periods. During these periods, you can enroll in courses, sign up to audit them and drop courses

  • When you log in to myHeritage, you’ll see an alert on your Home page that looks like this. Click the alert to go the registration page.
  • Go to My Profile and click the Registration tab.

How to register for courses

Registration table for course selection


First, let’s get oriented:

  • My Courses shows the courses (if any) in which you’re already registered for the term shown in the selector.
  • Available Courses shows the courses for which you may register.
  • Course names link to the Course > Info view, where you can have a look at course details. If information is missing, contact the professor.
  • Faculty names link to their Profiles.
  • indicates icon exclamationthat you’ve already passed this course. But it doesn’t prevent you from registering for it.

To register for courses:

  1. Find a course under Available Courses.  Pay close attention to the section numbers.  Section 1 – in class, Section 2 – online/distance learning.  Click either the Enroll or Audit plus signs.   Go to Home > Dashboard to see more detailed information regarding section numbers.
  2. If you see a greyed out icon in either column, you cannot register for that course in that way. Reasons include:
    • There may be an enrollment limit placed on the course.
    • You have not fulfilled the prerequisites to enroll in that course.
    • You have already registered for another section of that same course.
  3. As you select courses, the information for Available Courses updates:
    • The meeting times for regular weekly courses offered on campus that have schedule conflicts with My Courses turn red.  Multi modal and modular courses are listed separately under Course Calendar by clicking on each individual course.
    • The enroll/audit options for alternate sections of My Courses deactivate .
    • Hours/credits turn red if those courses would cause you to run afoul of the term’s Max Hours/Credits
  4. To remove a course, click the ‘minus’ button under My Courses.
  5. Click Save to finish. You can also click Undo Changes to erase any changes you made since you last saved registration.

A few things to remember…

  • Select courses in consultation with your Faculty Advisor.
  • The Registrar or your Faculty Advisor may apply a lock to your account. If that is the case, you’ll see a yellow banner at the top of the screen. As long as the lock is in place, you will not be able to make any changes to your registration—the Registrar or your Faculty Advisor must do so.
  • If you’re having trouble with registration, please contact your Faculty Advisor.
  • Your Faculty Advisor is listed under Student tab.  Look to the right side of your screen under Student Information.

The above information has been custom editted from Populi Help.  https://support.populiweb.com/hc/en-us/articles/223792447-Registering-for-courses.

Heritage Top Tasks 2016

The data below was collected during the Great Survey near the end of the 2015-2016 school year.  We had a sample size of 42 current students.

The methodology of focusing on Top Tasks was first introduced to me during an episode of The Web Ahead podcast.  Episode #106: Focusing on Customer Top Tasks with Gerry McGovern.

Also Gerry’s fantastic article on A List Apart called What Really Matters: Focusing on Top Tasks discussed the same topic with graphs and charts!  On to the Data.

HeritageCambridge.com Top Tasks

Task Votes % of Total Votes
Course/Program information 36 17%
Moodle course material access 26 12%
Emergency information (closures and cancellations) 23 11%
Upcoming events (chapels, conferences, on-campus tour) 21 10%
Register/Apply for a course or program 20 10%
Contact information for the school (address, phones number, email) 16 8%
Faculty and Staff (pictures and contact info) 13 6%
Student handbook 13 6%
Read the Clipboard 11 5%
Bookstore hours and info 5 2%
Download/Listen to Audio from conferences and campus events 5 2%
Student Counsel 4 2%
Download/Listen to Audio from chapel 4 2%
Cafeteria hours 4 2%
Aletheia 3 1%
History about Heritage College and Seminary 2 1%
Job application for on campus job 2 1%
Social media (Facebook, Twitter, YouTube) 2 1%
Video 0 0%
Donate for the benefit of future students 0 0%

Install A New Printer

STEP 1: Open the Print Server.

You must be logged onto the Heritage corporate network either through a wired or wireless connection.  For wireless connections, you must be on the Heritage Staff network.

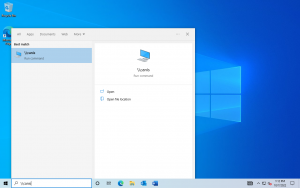
  • Open the Start menu, and in the search bar type:
    \\canis
  • If you are using a non-Heritage owned computer type:
    \\canis.heritagecollege.local
  • Press ENTER on your keyboard or click on the entry that your search found.  It should look similar to this screenshot.
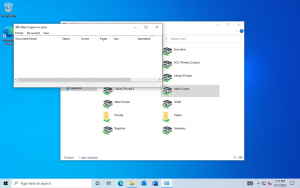
  • A window showing all the printers available on the printer server will appear.

STEP 2: Install the Printer

  • Double-click or press ENTER on the name of the printer you would like to install (a list of printers is below).  You can also right-click the printer and choose Open.
  • The driver installation process will begin.  If you are prompted to install the printer driver click Install driver.

FINISH:

  • The print queue for the newly installed printer will appear.  It will be titled with the name of the printer.  For example “Main Copier on canis”.  This is the sign that installation was successful.
  • You have successfully installed the printer!

Network Printers @ Heritage

  • Main Copier – Location: Admin office.  Canon high-volume multi-function color copier/printer/fax.  Includes a booklet finisher, stapler, and a 2/3 hole puncher.
  • Main Printer – Location: Admin office.  High volume HP printer.
  • HCC Copier – Location: Student Services.  Canon high-volume multi-function copier/printer.  Includes a stapler.
  • Library Copier – Location: Student Services.  Canon high-volume multi-function copier/printer.  Includes a stapler.
  • eminary – Location: Seminary Foyer.  High volume HP 4250 printer.

Setting Program Defaults (Adobe Reader vs Microsoft Edge)

From time to time I’ve noticed that the settings for my default applications on my Windows 10 PC are changed back to their original values.  I first noticed this upon upgrading to Windows 10 from Windows 7.  The default application for PDF documents was changed to Microsoft Edge.  This caused PDF documents to open in Edge rather than Adobe Reader when I double-clicked on them.

To change the default application for PDF documents (or any other file type), use this checklist.

  1. Find a PDF document in the File Explorer and right-click on it.
  2. Choose Open With from the menu.
  3. In the sub-menu select Choose another app.
  4. Choose Adobe Reader (or the app that you would like to use to open the file type you right-clicked on above).
  5. Enable the checkbox that reads Always use this app to open .pdf files.

Now all of your PDF files will open in Adobe Reader by default when you double-click on them.