Chapel Workstation and Projector System

The chapel at Heritage is fixed with a workstation (computer/PC) and widescreen projector such that folks can use the workstation to project slides, video, images, and more onto the large widescreen at the front.  We use this setup throughout the school year during our chapel services.  There is also a second projector facing the back wall so that presenters on stage can see what the audience sees.

Setup the Workstation and Projector

  • Flip on both of the switches in the production booth labelled A and B.  This will turn on the sound board and amps automatically.
  • Turn the computer on and log into it with these credentials.
    • username: chapel
    • password: Heritage1
  • Lower the screen.  Find the white remote control and press the down arrow once.  You don’t have to hold the button, the screen will lower into position and stop automatically.
  • Turn on the projectors.  There are two remotes plugged into thin black cables.  The black remote is for the front projector, the grey remote is for the rear projector.   Press ON to turn them on.  They will take a moment to fire up and light the bulbs so be patient and don’t press the ON button a bunch of times in a row.
  • Turn up the speaker volume by using the MAIN fader on the sound board.

At the end of the event, please turn the projectors off by pressing the ON button twice.

Simple Things to Avoid A Computer Virus

On Friday May 12th, a massive cyber attack was launched and has affected more than 230,000 computers in over 150 countries worldwide.  The attack affects computers running Microsoft Windows operating systems, particularly the older variety such as Windows XP.  This Wikipedia article goes into more detail about the ransomware called WannaCry.  There is a screenshot available which you should review.

https://en.wikipedia.org/wiki/WannaCry_ransomware_attack

There are already measures in place to reduce the potential for a software like this to affect our internal network.  However, there are still a few good things to keep in mind.

  • Be extremely critical of links and attachments within emails (even the one in this email).  If you receive an email with a link or attachment, make absolutely sure you know who sent you the email in the first place.  Even if the display name (the sender’s name that you can see) is a person or company your trust, the underlying email address may be different.
  • If you need to take action based on a request in an email, navigate to the website directly.  As an example, instead of clicking the link above to the Wikipedia article, open your browser, start with a fresh Google search page, and search for the name of the virus directly.  The first or second result should be that Wikipedia article.
  • At any time if you are unsure of an email or website, please feel free to ask a member of our IT staff.

If you believe you have been affected by this virus (or any virus), unplug the network cable from the back of your workstation and come find me right away.

VLAN Tagging and PVID

This is one of the best descriptions I’ve read about VLAN tagging and PVID (port virtual id).

http://en.community.dell.com/support-forums/network-switches/f/866/t/18619540

From Cerbrea:

There’s two things you can set on the port for VLANs….tagged or untagged and PVID.

If the port is set as untagged, then it tells the switch that the device(s) connected to that port are VLAN unaware, so any packet to be forwarded from that port out of the switch must be forwarded with the VLAN tag removed. If the port is set as tagged, then the destination device is VLAN aware, and packets will be forwarded with VLAN tags…so tagged /untagged is for packets leaving the switch.

Now for packets arriving at the switch port….if the packet arrives with a VLAN tag , then – providing that port is in the VLAN matching the tag – the packet will be forwarded; so if you have set a server NIC for instance to apply a VLAN ID , then  the packet arriving at the port will be tagged…so in this case you have a VLAN aware device forwarding packets already tagged , so you would configure the port into the appropraite VLAN as a tagged port. Note that if the packet arrives at the port tageed for a VLAN of which  the port is not a member, the switch will drop the packet.

If a packet arrives at the port from an end device carrying no VLAN tag, then the switch will add a VLAN tage which corresponds to the PVID, and then forward it within that VLAN; so the PVID mechanisim allows you to have traffic originating from a non-VLAN aware device to become an 802.1q packet, so that it can traverse to other switches and still be contained within the correct VLAN; so PVID is for non tagged packets arriving at a port on the switch.

Hope this helps

Downloads and Email Pop Up Windows in myHeritage

myHeritage has been a very helpful tool for us since going live in July of 2016.  That being said, there are always growing pains when moving to an entirely new database system for company management.  myHeritage displays certain content in a separate popup window like downloads and email windows withing the system.  In order to ensure you are able to download files or send email in myHeritage, please add an exception for myHeritage to your browsers list of Pop Up blocker exceptions.

Populi wrote a new article about this topic called Why Won’t the Email Windows Open When I Try to Email A Group of People.

Google Chrome

  • Click the main menu in the top-right (represented by three vertical dots) and choose Settings.
  • Scroll down and click the link that says Show advanced settings…
  • Immediately under the Privacy section click the Content settings... button.
  • Scroll down to the Pop-ups section and leave the setting at Do not allow any site to show pop-ups.
  • Click the Manage exceptions... button.
  • Add heritage.populiweb.com to the list of exceptions.  Ensure the behaviour is set to Allow and click Done.
  • You’re done.

Microsoft Edge

If you are using Microsoft Edge, it seems to handle the exception even with Pop-up blocker enabled.  If you are using Internet Explorer, I would suggest migrating to Microsoft Edge.

Add a New Site to IIS Reverse Proxy with Application Request Routing

General Overview of steps.

  • Install the security certificate in IIS.
  • Add a new site.  The web root should be an arbitrary folder in wwwroot\reverse.
  • Add two site bindings.  One for HTTP and one for HTTPS.  Specify a hostname.  For HTTPS Require Server Name Indication.  Specify the SSL certificate you imported earlier.
  • Create or Ensure that the web server that is hosting the site is available through Server Farms (application request routing).
  • Click on the top-level Web server tree (Sombrero) and then open on URL  Rewrite.
  • There should be a rule for each server farm.  If there is not a rule for this server farm, add one.  Rule settings are below.
    • Requested URL: Matches Pattern
    • Using: Wildcards
    • Pattern: *
    • Under Conditions, add a new condition and specify the new application or site’s domain name as the pattern.  The condition input should be {HTTP_HOST}.
    • Action Type: Route to Server Farm
      • Scheme: https://
      • Server Farm: the farm were the application/site is hosted.

Bad Gateway 502 Error

Once the reverse proxy is setup on Sombrero and the traffic forwarded to the back-end server, there have been instances where navigating to the site produces a Bad Gateway 502 error.  This is usually caused by an mismatch of the principal name used in the certificate on the back-end server and the domain name used in reverse proxy rule on Sombrero.

Most recently, when setting up https://finance.heritageapps.ca I ran into this issue.  The root cause was sourced to a mismatch of the domain name used in the server farm where the rule was pointed to.  I was using the internal domain name of the internal server, which in this case was tripping up IIS and causing the bad gateway error.  To fix this, I used split DNS (which I had already setup) for the heritageapps.ca domain.  Internally I point the same domain (finance.heritageapps.ca) to the back-end server.  So, I just used this same name in the server farm configuration to point to my internal server.

Web Design Process Links

Below are a number of links that have helped form some of my thinking about the web design process over the past couple of years.

Responsive Web Design Articles

Content Design

Style

Heritage Top Tasks 2016

The data below was collected during the Great Survey near the end of the 2015-2016 school year.  We had a sample size of 42 current students.

The methodology of focusing on Top Tasks was first introduced to me during an episode of The Web Ahead podcast.  Episode #106: Focusing on Customer Top Tasks with Gerry McGovern.

Also Gerry’s fantastic article on A List Apart called What Really Matters: Focusing on Top Tasks discussed the same topic with graphs and charts!  On to the Data.

HeritageCambridge.com Top Tasks

Task Votes % of Total Votes
Course/Program information 36 17%
Moodle course material access 26 12%
Emergency information (closures and cancellations) 23 11%
Upcoming events (chapels, conferences, on-campus tour) 21 10%
Register/Apply for a course or program 20 10%
Contact information for the school (address, phones number, email) 16 8%
Faculty and Staff (pictures and contact info) 13 6%
Student handbook 13 6%
Read the Clipboard 11 5%
Bookstore hours and info 5 2%
Download/Listen to Audio from conferences and campus events 5 2%
Student Counsel 4 2%
Download/Listen to Audio from chapel 4 2%
Cafeteria hours 4 2%
Aletheia 3 1%
History about Heritage College and Seminary 2 1%
Job application for on campus job 2 1%
Social media (Facebook, Twitter, YouTube) 2 1%
Video 0 0%
Donate for the benefit of future students 0 0%

Install A New Printer

STEP 1: Open the Print Server.

You must be logged onto the Heritage corporate network either through a wired or wireless connection.  For wireless connections, you must be on the Heritage Staff network.

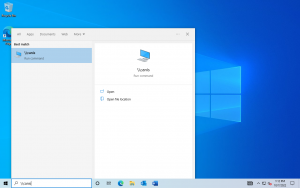
  • Open the Start menu, and in the search bar type:
    \\canis
  • If you are using a non-Heritage owned computer type:
    \\canis.heritagecollege.local
  • Press ENTER on your keyboard or click on the entry that your search found.  It should look similar to this screenshot.
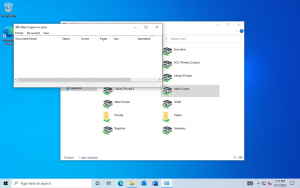
  • A window showing all the printers available on the printer server will appear.

STEP 2: Install the Printer

  • Double-click or press ENTER on the name of the printer you would like to install (a list of printers is below).  You can also right-click the printer and choose Open.
  • The driver installation process will begin.  If you are prompted to install the printer driver click Install driver.

FINISH:

  • The print queue for the newly installed printer will appear.  It will be titled with the name of the printer.  For example “Main Copier on canis”.  This is the sign that installation was successful.
  • You have successfully installed the printer!

Network Printers @ Heritage

  • Main Copier – Location: Admin office.  Canon high-volume multi-function color copier/printer/fax.  Includes a booklet finisher, stapler, and a 2/3 hole puncher.
  • Main Printer – Location: Admin office.  High volume HP printer.
  • HCC Copier – Location: Student Services.  Canon high-volume multi-function copier/printer.  Includes a stapler.
  • Library Copier – Location: Student Services.  Canon high-volume multi-function copier/printer.  Includes a stapler.
  • eminary – Location: Seminary Foyer.  High volume HP 4250 printer.

Setting Program Defaults (Adobe Reader vs Microsoft Edge)

From time to time I’ve noticed that the settings for my default applications on my Windows 10 PC are changed back to their original values.  I first noticed this upon upgrading to Windows 10 from Windows 7.  The default application for PDF documents was changed to Microsoft Edge.  This caused PDF documents to open in Edge rather than Adobe Reader when I double-clicked on them.

To change the default application for PDF documents (or any other file type), use this checklist.

  1. Find a PDF document in the File Explorer and right-click on it.
  2. Choose Open With from the menu.
  3. In the sub-menu select Choose another app.
  4. Choose Adobe Reader (or the app that you would like to use to open the file type you right-clicked on above).
  5. Enable the checkbox that reads Always use this app to open .pdf files.

Now all of your PDF files will open in Adobe Reader by default when you double-click on them.