How to book a vehicle

Heritage-owned vehicles can be booked through Outlook. The process is similar to booking a meeting room.

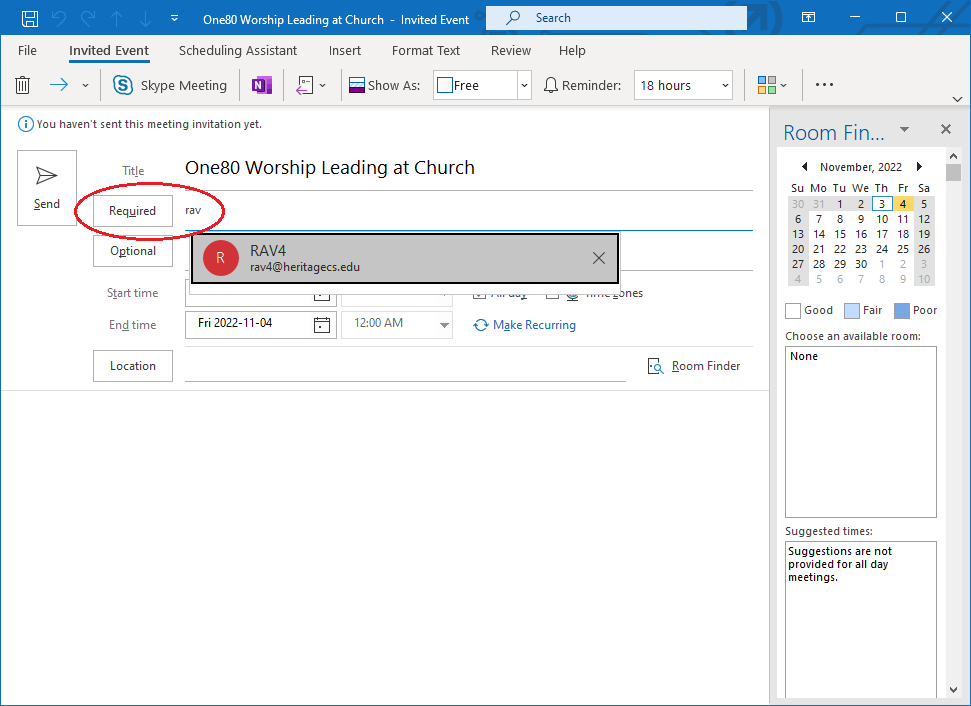
  • Create a New Meeting in Outlook.
  • In the Required (or Optional) field, type the name of the vehicle. Note: for equipment, like vehicles, we use the Required or Optional fields rather than the Location field (we would use the Location field if we were booking a meeting room).
  • Choose your start and end dates and times.
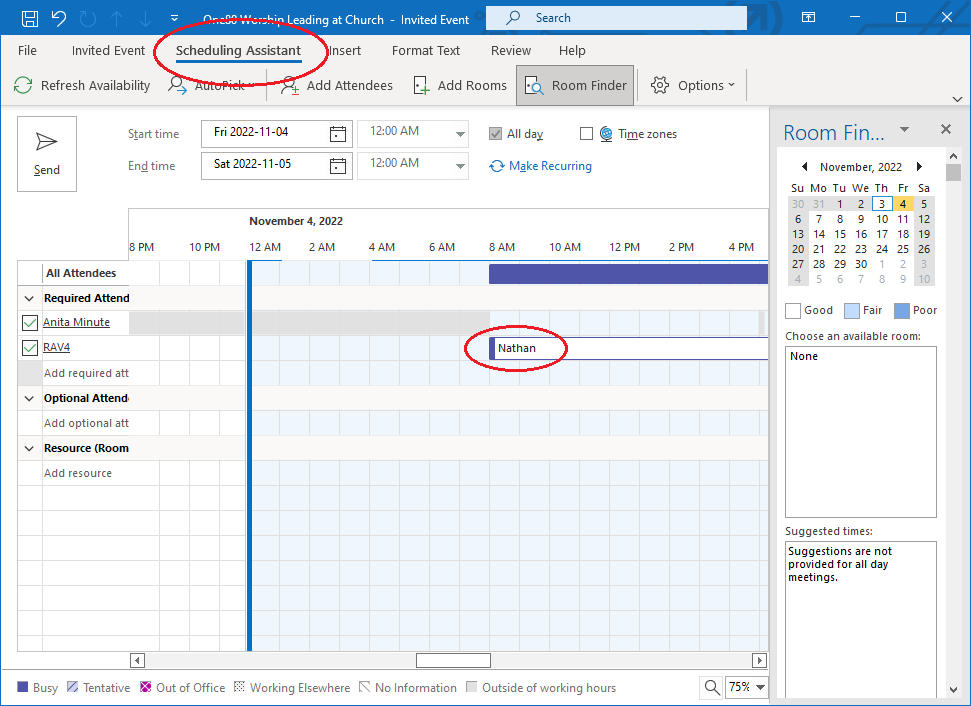
  • You can optionally use the Scheduling Assistant view to check the availability of the vehicle or to see who has it booked.
  • When you are happy with the booking details, and after you have included the vehicle as a Required or Optional attendee for the New Meeting, click Send.
  • You will receive a response from the system indicating the status of your booking. If the vehicle is available during the date/time selected the booking will be accepted.

Frame your webcam like a pro

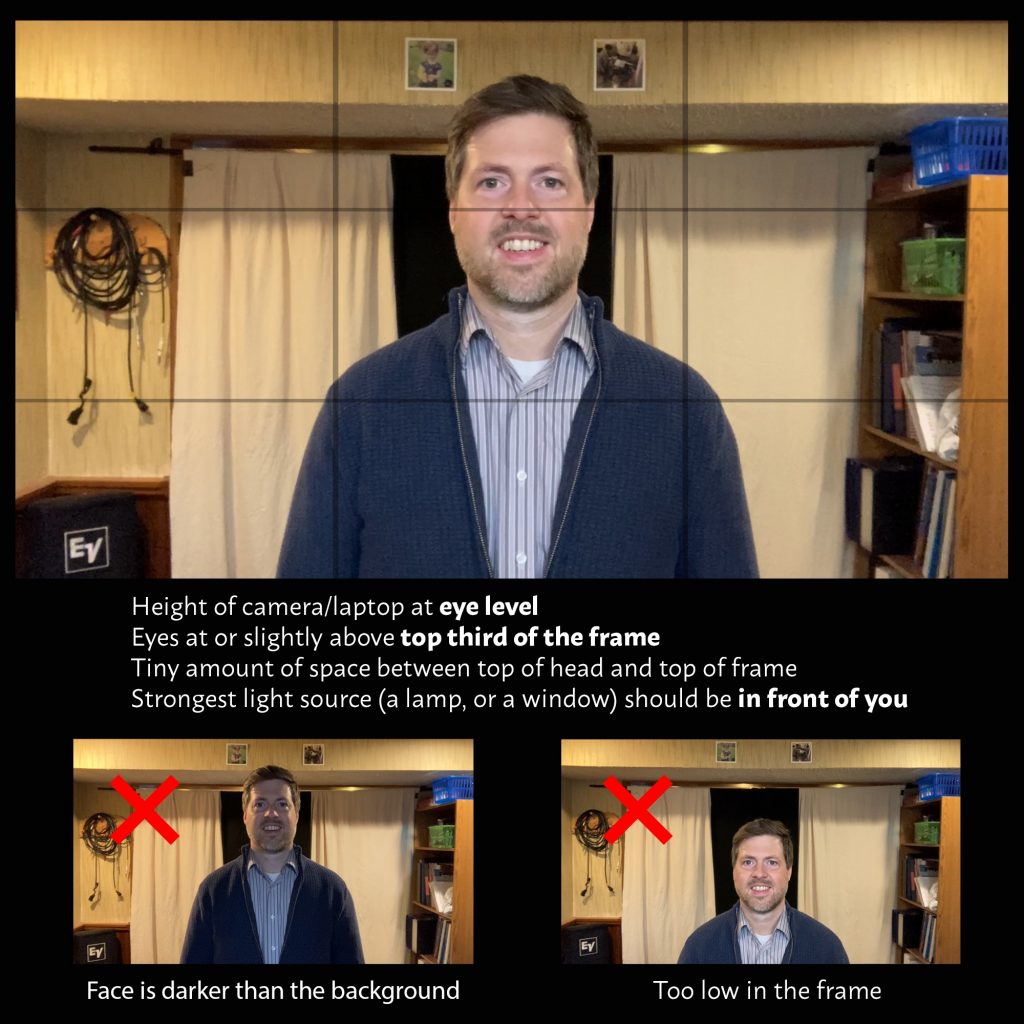
Here are some general guidelines for framing a single subject while using a webcam. These guidelines work for most talking head shots as well.

  • Height of the camera or laptop or webcam should be at eye level. If it’s too low, the shot will come from below and people will see up your nose.
  • Your eye should be at or slightly above the top third of the frame.
  • The strongest light source in the room, such as a lamp, or an open window) should be in front of you.
  • There should be a tiny amount of space between the top of your head and the top of the frame.

Attend a Teams Live Event

We use the Teams Live Event broadcasting platform to host the online audience for many of our premiere events throughout the year such as the Heritage Preaching Lectures (HPL) or Ministry Leadership Day (MLD). If you’ve received an Attendee Link (likely sent to you over email) to one of these events, use the images below to get a sense of what to expect when you click the Attendee Link.

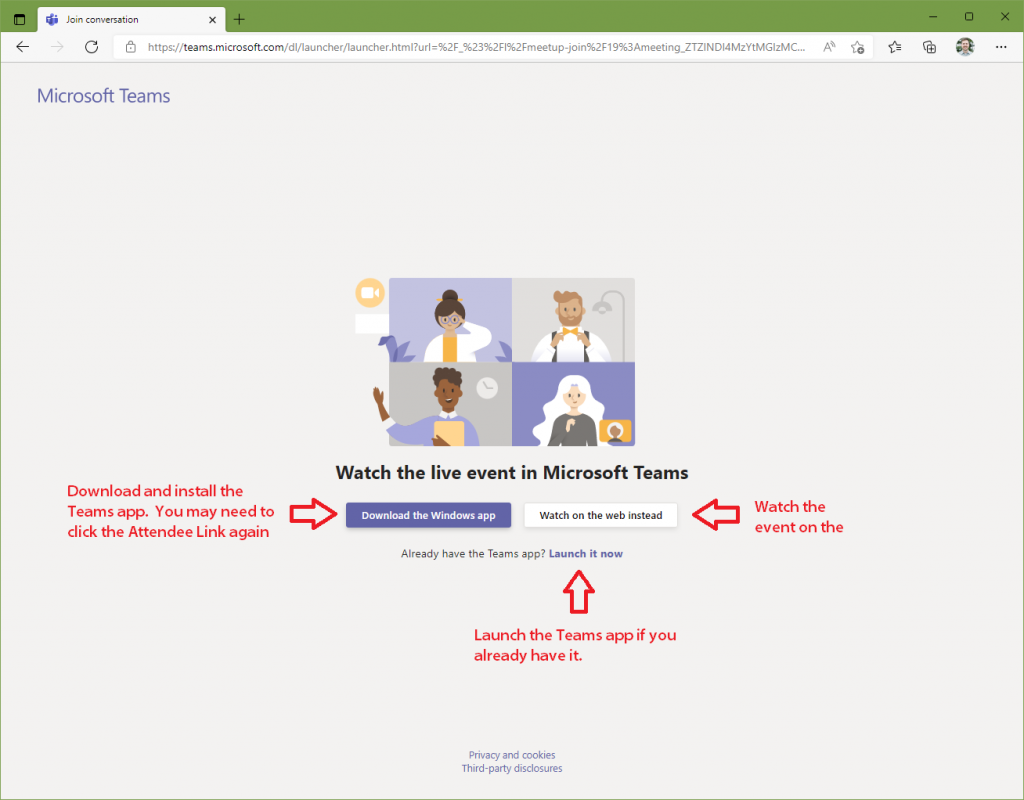
Step 1: Click the Attendee Link

When you click the Attendee Link in the email from Heritage you may see the following screen. It is possible, if you already have the Teams app installed, that this screen may be skipped automatically. In that case, you’re probably already on to step 2.

Options on this screen include:

  • Download and install the Teams app
  • Watch the event on the web instead
  • Launch the Teams app (if you have it installed already and it didn’t launch automatically)

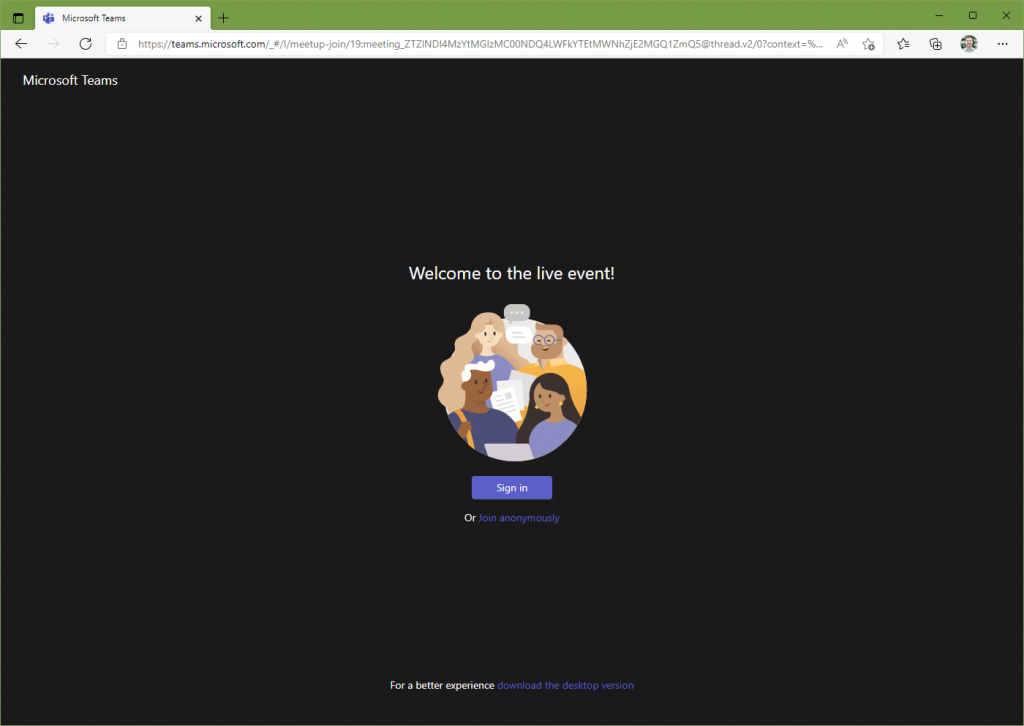
Step 2: Join the Event

The first screen you will see is the Join screen. It will look similar to the image below. You will have the option to Join anonymously or to Sign in. You can join the event directly from a browser (Such as Firefox, Edge, Safari, or Chrome) or by downloading the Microsoft Teams app.

If you have a Microsoft Teams account, feel free to sign in. Otherwise, just click Join anonymously to access the event.

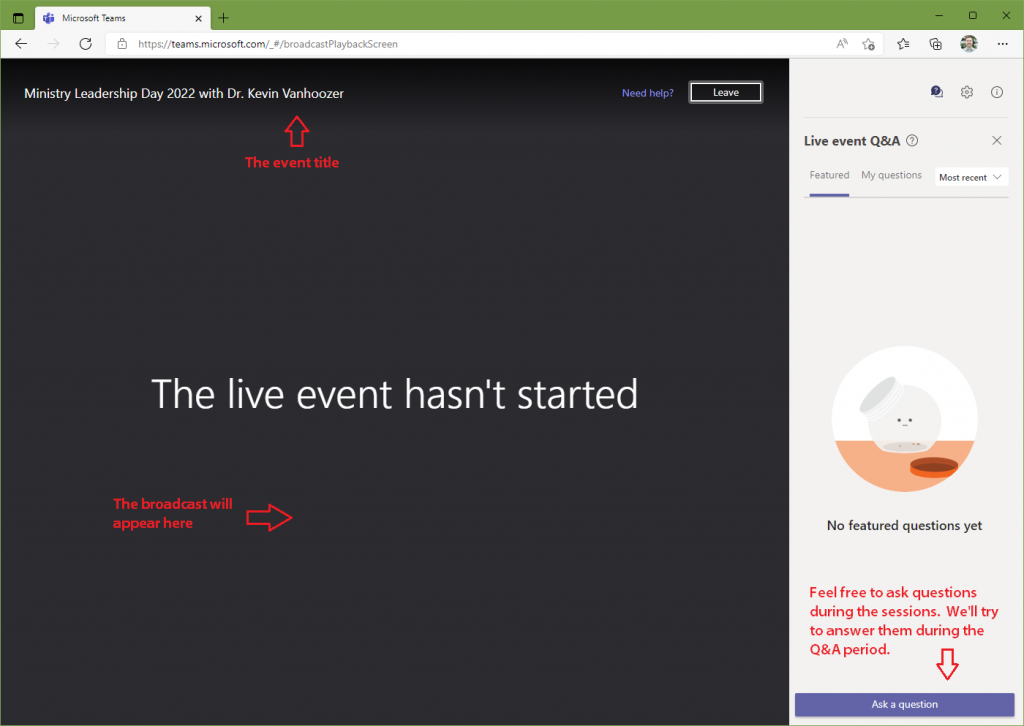
Step 3: Enjoy the Event

After you’ve joined the event, the event screen will appear. Once we start broadcasting from our event location, the screen will change to show our broadcast feed. If you join before we’ve started broadcasting you’ll be greeted by a friendly message.

Feel free to use the Ask a question button to submit a question. Many of events feature a question and answer (Q&A) period where we will answer as many questions as possible.

Accounts and IDs in use at Heritage

Heritage uses a number of different Accounts and IDs to identify you when accessing digital resources. Below is a list of the accounts and IDs in use at Heritage.

Heritage ID

This account is used by our staff and faculty. It allows individuals access to their Heritage email through Outlook on the Web, Microsoft 365 tools such as Teams and OneDrive, ADP Workforce Now, and more. Your Heritage ID and your Heritage email account are the same account.

myHeritage Account

This is an account in use by all members of the Heritage community. This includes students, faculty, staff, and alumni. myHeritage (Populi) is our college management system. It helps us keep track of our student records, facilitate classes and publish class content, among many other things.

Student ID

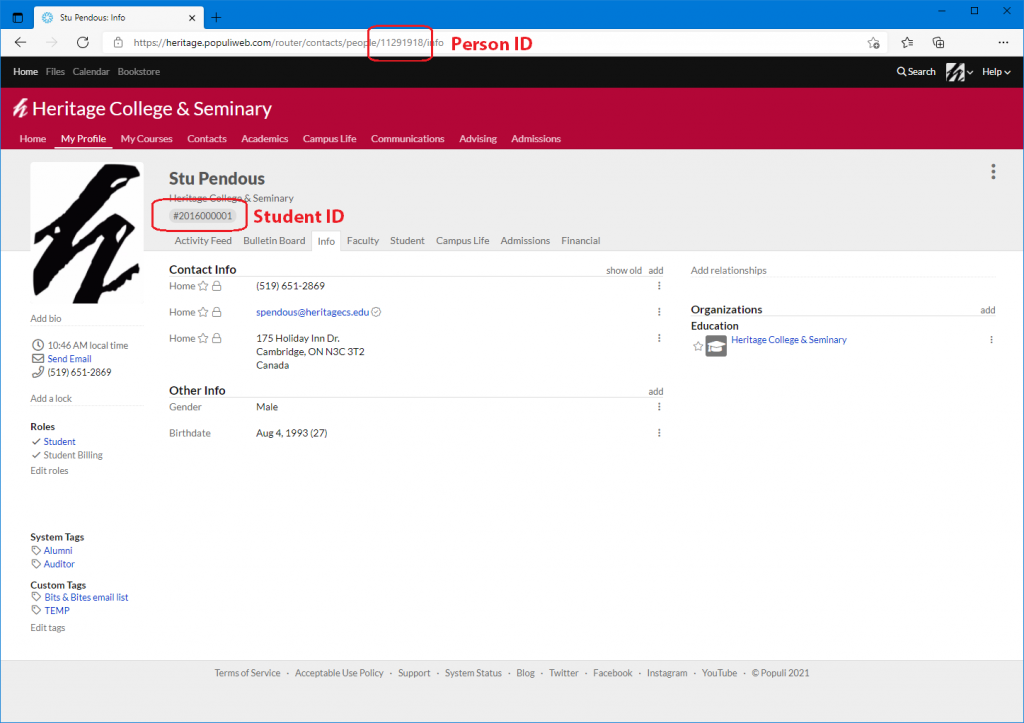
The Student ID is given to you when you become at student at Heritage. It is a unique number that is tied to your student record. It is assigned automatically by the myHeritage database when your student record is first created. Your student ID is easy to identify. It is the number directly underneath your name on the My Profile page in myHeritage. This number is also printed on your student card.

Person ID

The Person ID is a unique number that is automatically assigned to each individual represented in the myHeritage database. In the coming years, we will start using this ID across multiple systems to provide digital resources such as library resources. The Person ID is also easy to find. Simply navigate to the My Profile page in myHeritage. Then, in the address bar of your browser look for the eight (8) digit number (see image). That is your Person ID. This number may also be printed on your student card.

ADP Workforce Now Login

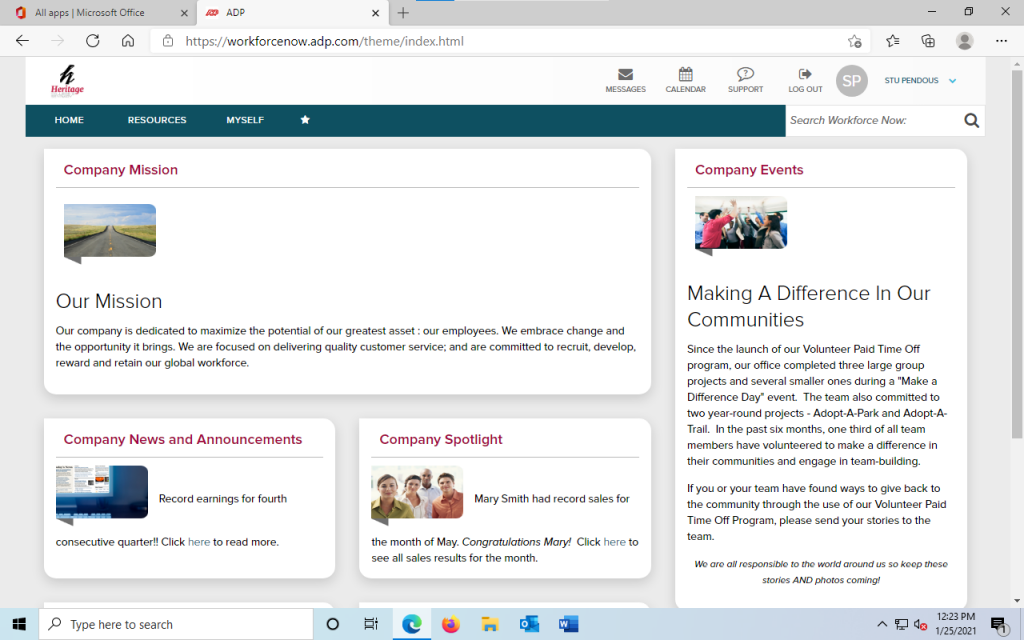
ADP Workforce Now is our new Human Resources tool. It’ll be our go-to tool for time sheet submissions, payroll information, vacation tracking, and more. You can access ADP Workforce Now in one of two ways. Login in using your Heritage ID or an ADP Workforce Now direct account.

Login using your Heritage ID

STEP 1: Login to Office 365

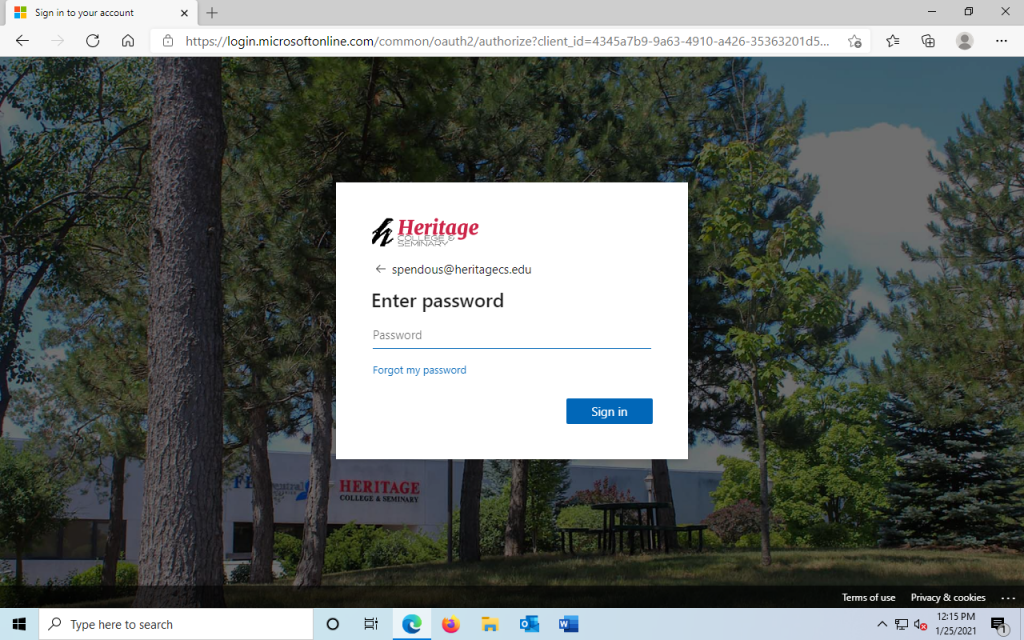
Login to the Heritage Office 365 portal using your Heritage ID* at office.heritagecs.edu. A link to this portal can also be found in the Helpdesk page of our website at discoverheritage.ca/helpdesk.

* Your Heritage ID is the same account as your Heritage email account, and the same account you might use to access a Heritage provided computer.

STEP 2: Open the ADP Workforce Now app

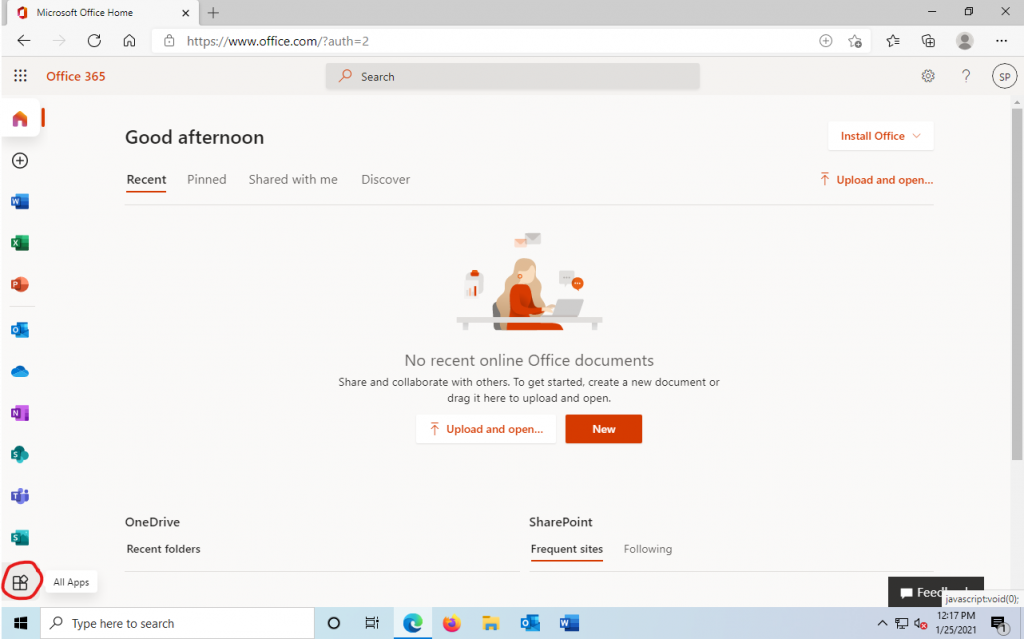
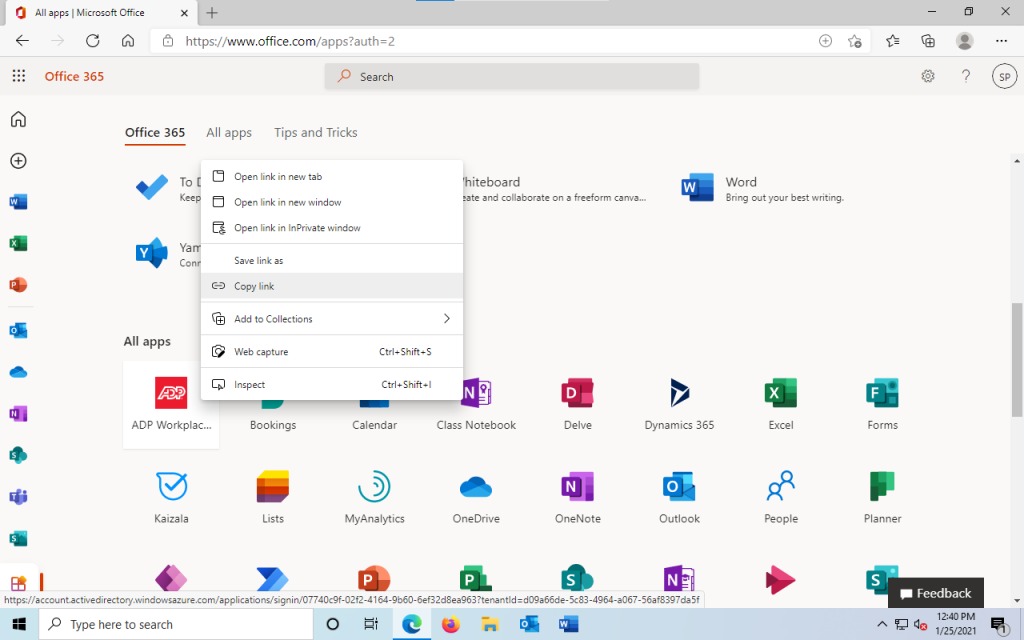
Once you’ve logged into the Heritage Office 365 portal, click on the All Apps button in the lower left.

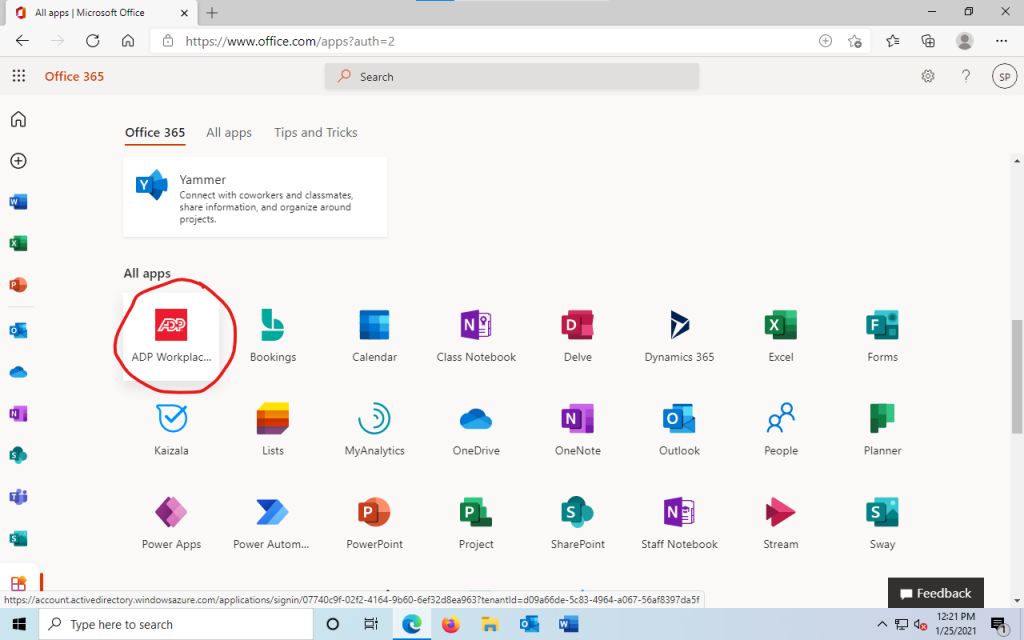
Scroll down and look for the ADP Workforce Now icon. It’s red with the ADP logo in the middle. Clicking the app icon will open ADP Workforce Now.

Clicking on the app icon will automatically authenticate your Heritage ID and will open the ADP Workforce Now app.

Pro Tips

ADP Workforce Now is supported in desktop versions of Edge, Firefox, Chrome, and Safari.

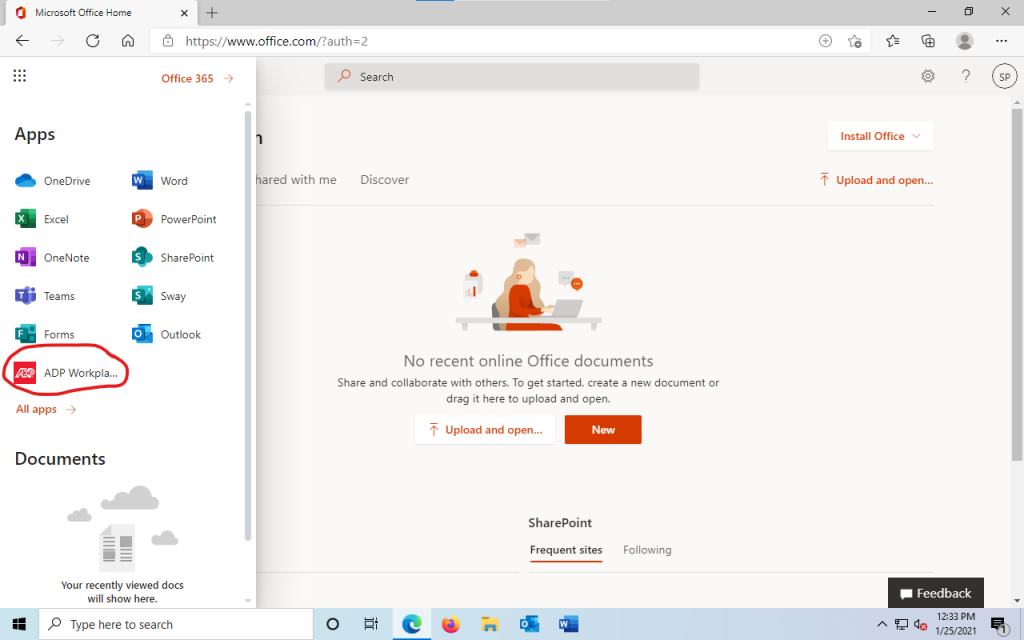
Once you’ve accessed ADP Workforce Now through Office 365 at least once, the ADP Workforce Now app will now be available from the Waffle menu in the top-left of Office 365.

You can save a shortcut/bookmark to ADP Workforce Now by right-clicking the icon in Office 365 -> All Apps and choosing Copy Link from the context menu. Then just create a bookmark in your browser of choice and paste the link info into it. This way, you’ll be able to login directly without having to open Office 365 first.

Publishing Course Content on myHeritage

At Heritage, we use myHeritage (Populi) to publish our course content.  For your course, this can be done from the Lessons tab.

This article represents a summary of how to upload multimedia (video or audio) to your course. Populi has published a more detailed article on this topic called How to embed audio, video, and other kinds of files in a lesson.  Feel free to check it out for more info.

Upload them from your computer

  • Click the Add a Lesson button or open an existing lesson.
  • Click the Design tab to open the design view.
  • Choose to Add a Section and click File.
  • Drag and drop the file from your computer into the area that says Drag & Drop.
  • Once the video file is uploaded, click Save.  If this is a video file, the size is likely huge, so be patient.
  • There are other options in this view like marking a file as required.
  • When you save the file, Populi kicks off an encoding process (much like YouTube’s encoding) to get it ready for multiple device types.

Upload them directly from your phone or tablet

If you’ve recorded your file on a smartphone or tablet, you can upload them directly to myHeritage.

  • Open myHeritage is a browser (Safari, Firefox, Chrome, etc.) and login with your myHeritage account.
  • Navigate to your course and open the Lessons tab.
  • Touch the Add a Lesson button or open an existing lesson.
  • Touch the Design tab to open the design view.
  • Choose to Add a Section and click File.
  • Touch on the area that says Drag & Drop a File or Click to Choose.  This will open the file explorer on your platform.
  • For example, on iOS choose Photo Library.  Find the video you took (or edited) and touch Done.
  • Once the video file is uploaded, click Save

Classroom Equipment

All Heritage classrooms are outfitted with a relatively standard set of equipment.  Below is a list of the equipment available.  Some rooms have additional video and audio equipment to enable distance learning programs.  Feel free to have a look at this video if you’d like to familiarize yourself with the equipment in the classrooms.

Standard Equipment & Furniture

These pieces of equipment are available in every classroom on the Heritage campus.

  • Podium – a podium to rest lecture notes or a laptop or tablet on.
  • Computer – running the latest version of Windows 10.  Pre-loaded software includes…
    • Microsoft Office
    • Microsoft Teams
    • Zoom
    • VLC Media Player – video, audio, and DVD playback
    • AirServer (see below)
  • Projector – can display the computer, or another device using HDMI or VGA.
  • Screens – a primary screen and the projector screen both connected to the computer.
  • Speakers – all rooms have some form of external speakers.  In rooms with connected classroom equipment, the speakers are controlled from the touchscreen.
  • Credenza – a cabinet with the room equipment.

Microsoft Teams and Zoom

Microsoft Teams licenses are provided for all Heritage faculty, adjunct faculty, and staff.  Simply login to Microsoft Teams with your Heritage ID to access your meetings and this video conferencing platform.  Zoom licenses may be purchased and provisioned on a case-by-case basis by contacting the Heritage IT department.  For each of these tools, make sure you Sign Out before you leave the classroom.

AirServer

AirServer is a piece of software that allows us to connect a laptop, tablet, or smartphone using wireless display technology.  It replicates the functionality of Apple AirPlay, Miracast for Windows, and Google Chromecast.  To take advantage of this, your device must be connected to the Heritage Staff wireless network.  See the IT department for access to this network.

Connected Classrooms

Our connected classrooms (to date this includes classroom 102 and 201) have additional equipment for supporting classes with distance learning students.

  • Camera – a camera mounted on the wall.
  • TV – a large screen mounted on the wall near the camera for displaying far end video callers.
  • Microphones – Most rooms have multiple microphones.
    • Podium mic always wired.
    • Wireless lavalier mic.
    • Room mics.
  • Touchscreen – A small touchscreen to control the camera, microphones, and in some rooms (201) it can control the speakers.

Self-Guided Setup: MacBook

The laptop MUST be on the Heritage Staff wireless network for this process to work.  If you received the machine directly from the IT department, it will be.

Step 1: Login with your Heritage account

  • At the login screen click Other…
  • Enter your Heritage ID username (typically first initial + last name) and password
  • Press Enter
  • At the SecureToken prompt click Bypass

Step 2: Work through the Apple setup prompts

  • Please use the Apple ID assigned by the IT department when setup prompts you for an Apple ID.  This Apple ID will provide you with 200GB of iCloud storage for backups.  It will also associate the Mac hardware with this Apple ID.
  • You can still use a personal Apple ID for other Apple services such as iMessage and the App Store.

Step 3: Setup Heritage email

  • Open Outlook from Launcher or Spotlight
  • Click Get Started
  • Sign In to Outlook using your Heritage ID email address and password
  • Click Start Using Outlook
  • Click Add <username>@heritagecs.edu
  • Click Done

Step 4: Setup other applications

Feel free to launch and set up other applications such as…

  • OneDrive
  • Teams

A Recording Studio in Your Pocket

There are almost unlimited options for recording video material in a professional way these days.  This article discusses some best practices for setup, getting a good picture, capturing good audio, and goes through a few recording hardware and software combos.  At the end, I’ll show you how to publish that material on myHeritage (Populi).

Setup

The good news is, that you can get a quality recording with almost any modern computer hardware.  You can record with something as simple as a smartphone, or something as elaborate as a camcorder or DSLR camera.  However, the most important element of your video is lighting.

When recording, make sure your face is front lit, rather than back lit.  Try to angle yourself in the room so that the brightest lights or windows are in front of your face, and not directly behind you.  If possible, angle the primary light source (called a key light) so it is just slightly off-axis to one side – no more than 45 degrees.  You can accomplish this by using natural light sources like a nearby window, or light fixtures that already exist in your room.  You can also opt to purchase a small light kit with a stand for greater control.  This will ensure that your face is well lit and easy to see, and the off-axis angle will help provide some controlled shadows and depth for a more natural look.

Regardless of what hardware you have, do your best to mount the camera so it is just above eye level.  Frame yourself in the middle of the frame with your eyes about one-third from the top edge of the frame.  This will provide the most natural composition.

If you are using a smartphone or tablet, using some kind of clip or stand can help you angle the camera in the right way.  Feel free to get creative with how you ‘mount’ the camera (or smartphone).  No one will see your setup anyway, and spending a bit of time to get the camera in the right spot can really pay off.

If you are using a laptop with a webcam, try propping the laptop up on a stack of books to get the camera higher.  A music stand can be very helpful if you have one available.

Record in a quiet room.  This probably goes without saying, but I’m going to say it anyway.  Audio is as important, if not more important, than the quality of your video.  People will suffer through bad video if the audio quality is good.  But if the audio quality is bad, it makes folks want to turn it off.  So, record in a quiet room that contains some furniture.  Recording in a room with many hard surfaces can make speech less intelligible and therefore harder to listen to.  The build-in microphones in modern laptops and smartphones can produce good audio results, but only in a quiet room.  So, record in a quiet room such as an office with a bookshelf full of books, or a bedroom with a carpet and a bed.

Always do a test recording or two (or five) and listen back to see how they sound before you commit to an entire lecture.  A set of headphones, or even earbuds, can be extremely helpful in hearing how the recording sounds.

To sum up…

  • Put the primary light source (key light) in the room, in front of you, and not behind you.
  • Mount the camera so it’s just above your eyeline (ever so slightly).
  • Record in a quiet room.
  • Do some test recordings before you commit to a whole lecture.

Record

There are so many hardware options for recording nowadays.  Laptops, smartphones, tablets, pocket recorders, field recorders, USB/thunderbolt interfaces, and more.  The list goes on and on.  The hardware commonly available today would have cost multiple thousands of dollars twenty years ago.  Essentially, we all have access to a modern, high-quality portable recording studio.

Camera App on iOS and iPadOS

The Camera app in iOS and iPadOS is the easiest option that produces the highest quality results.  The app gets consistently good results by recording the built-in cameras (front or rear) on an Apple iPhone, iPod Touch, or iPad.

  • Setup your lighting and camera rigging/stand/pop-socket.
  • Open the Camera app and frame yourself as described above.
  • Choose video mode and hit record.
  • Remember to test audio.

Once you’re done recording, copy the file off of your iOS device.  There are a couple ways to do this.

  • Copy the file directly to your computer by plugging it in over USB.
  • Upload the file to cloud-based storage such as iCloud, Microsoft OneDrive, or Google Drive.  Then download the file to your computer.

Alternatively, you can upload the file directly from your smartphone to myHeritage.  See below in the section called Publish.

Other Options on iOS

iMovie

You can also use iMovie to capture quality recording from the build-in cameras.  iMovie gives you more control over the recording settings but is harder to use.

Filmic Pro

This is an iOS (and Android) app built by a third-party that gives the film maker complete control over your recordings.  You can tweak the resolution, framerate, bitrate, audio, and other settings.  It comes at a cost, but is worth it if you need that level of control.

MacOS and the Webcam

If you own a MacBook or an iMac, you are blessed with a device that has all the hardware built-in to get decent quality recordings.  Below are a few apps that can help you capture the magic.

iMovie

This guide isn’t meant to be a full-blown tutorial on how to use iMovie, but if you have access to iMovie, it’s an easy way to get started recording and get professional results quickly with a

  • In iMovie, open File -> Import Media…
  • In the left column select FaceTime HD Camera, your webcam will be displayed.
  • Press the Record button in the middle and record your clip.  Press it again to stop.
  • Click Close.
  • In the My Media view, your new clip will appear.
  • Import it into a timeline (below), do any necessary trimming or adding other clips, or titles.
  • Choose the Share button in the top-right of iMovie to export your video to a file.

QuickTime

MacOS comes pre-installed with QuickTime.  You can use QuickTime to capture your webcam and built-in microphone.  To capture a movie in QuickTime, try this.

  • Find and launch the QuickTime Player app.
  • Open File -> New Movie Recording.
  • Click the red record button.
  • Save and upload your movie file to myHeritage.

Publish

At Heritage, we use myHeritage (Populi) to publish our course content.  For your course, this can be done from the Lessons tab.

Upload them from your computer

  • Click the Add a Lesson button or open an existing lesson.
  • Click the Design tab to open the design view.
  • Choose to Add a Section and click File.
  • Drag and drop the file from your computer into the area that says Drag & Drop.
  • Once the video file is uploaded, click Save.  If this is a video file, the size is likely huge, so be patient.
  • There are other options in this view like marking a file as required.
  • When you save the file, Populi kicks off an encoding process (much like YouTube’s encoding) to get it ready for multiple device types.

Upload them directly from your phone or tablet

If you’ve recorded your file on a smartphone or tablet, you can upload them directly to myHeritage.

  • Open myHeritage is a browser (Safari, Firefox, Chrome, etc.) and login with your myHeritage account.
  • Navigate to your course and open the Lessons tab.
  • Touch the Add a Lesson button or open an existing lesson.
  • Touch the Design tab to open the design view.
  • Choose to Add a Section and click File.
  • Touch on the area that says Drag & Drop a File or Click to Choose.  This will open the file explorer on your platform.
  • For example, on iOS choose Photo Library.  Find the video you took (or edited) and touch Done.
  • Once the video file is uploaded, click Save

Populi has published a more detailed article on this topic called How to embed audio, video, and other kinds of files in a lesson.  Feel free to check it out for more info.