Self-Guided Setup: MacBook

The laptop MUST be on the Heritage Staff wireless network for this process to work.  If you received the machine directly from the IT department, it will be.

Step 1: Login with your Heritage account

  • At the login screen click Other…
  • Enter your Heritage ID username (typically first initial + last name) and password
  • Press Enter
  • At the SecureToken prompt click Bypass

Step 2: Work through the Apple setup prompts

  • Please use the Apple ID assigned by the IT department when setup prompts you for an Apple ID.  This Apple ID will provide you with 200GB of iCloud storage for backups.  It will also associate the Mac hardware with this Apple ID.
  • You can still use a personal Apple ID for other Apple services such as iMessage and the App Store.

Step 3: Setup Heritage email

  • Open Outlook from Launcher or Spotlight
  • Click Get Started
  • Sign In to Outlook using your Heritage ID email address and password
  • Click Start Using Outlook
  • Click Add <username>@heritagecs.edu
  • Click Done

Step 4: Setup other applications

Feel free to launch and set up other applications such as…

  • OneDrive
  • Teams

A Recording Studio in Your Pocket

There are almost unlimited options for recording video material in a professional way these days.  This article discusses some best practices for setup, getting a good picture, capturing good audio, and goes through a few recording hardware and software combos.  At the end, I’ll show you how to publish that material on myHeritage (Populi).

Setup

The good news is, that you can get a quality recording with almost any modern computer hardware.  You can record with something as simple as a smartphone, or something as elaborate as a camcorder or DSLR camera.  However, the most important element of your video is lighting.

When recording, make sure your face is front lit, rather than back lit.  Try to angle yourself in the room so that the brightest lights or windows are in front of your face, and not directly behind you.  If possible, angle the primary light source (called a key light) so it is just slightly off-axis to one side – no more than 45 degrees.  You can accomplish this by using natural light sources like a nearby window, or light fixtures that already exist in your room.  You can also opt to purchase a small light kit with a stand for greater control.  This will ensure that your face is well lit and easy to see, and the off-axis angle will help provide some controlled shadows and depth for a more natural look.

Regardless of what hardware you have, do your best to mount the camera so it is just above eye level.  Frame yourself in the middle of the frame with your eyes about one-third from the top edge of the frame.  This will provide the most natural composition.

If you are using a smartphone or tablet, using some kind of clip or stand can help you angle the camera in the right way.  Feel free to get creative with how you ‘mount’ the camera (or smartphone).  No one will see your setup anyway, and spending a bit of time to get the camera in the right spot can really pay off.

If you are using a laptop with a webcam, try propping the laptop up on a stack of books to get the camera higher.  A music stand can be very helpful if you have one available.

Record in a quiet room.  This probably goes without saying, but I’m going to say it anyway.  Audio is as important, if not more important, than the quality of your video.  People will suffer through bad video if the audio quality is good.  But if the audio quality is bad, it makes folks want to turn it off.  So, record in a quiet room that contains some furniture.  Recording in a room with many hard surfaces can make speech less intelligible and therefore harder to listen to.  The build-in microphones in modern laptops and smartphones can produce good audio results, but only in a quiet room.  So, record in a quiet room such as an office with a bookshelf full of books, or a bedroom with a carpet and a bed.

Always do a test recording or two (or five) and listen back to see how they sound before you commit to an entire lecture.  A set of headphones, or even earbuds, can be extremely helpful in hearing how the recording sounds.

To sum up…

  • Put the primary light source (key light) in the room, in front of you, and not behind you.
  • Mount the camera so it’s just above your eyeline (ever so slightly).
  • Record in a quiet room.
  • Do some test recordings before you commit to a whole lecture.

Record

There are so many hardware options for recording nowadays.  Laptops, smartphones, tablets, pocket recorders, field recorders, USB/thunderbolt interfaces, and more.  The list goes on and on.  The hardware commonly available today would have cost multiple thousands of dollars twenty years ago.  Essentially, we all have access to a modern, high-quality portable recording studio.

Camera App on iOS and iPadOS

The Camera app in iOS and iPadOS is the easiest option that produces the highest quality results.  The app gets consistently good results by recording the built-in cameras (front or rear) on an Apple iPhone, iPod Touch, or iPad.

  • Setup your lighting and camera rigging/stand/pop-socket.
  • Open the Camera app and frame yourself as described above.
  • Choose video mode and hit record.
  • Remember to test audio.

Once you’re done recording, copy the file off of your iOS device.  There are a couple ways to do this.

  • Copy the file directly to your computer by plugging it in over USB.
  • Upload the file to cloud-based storage such as iCloud, Microsoft OneDrive, or Google Drive.  Then download the file to your computer.

Alternatively, you can upload the file directly from your smartphone to myHeritage.  See below in the section called Publish.

Other Options on iOS

iMovie

You can also use iMovie to capture quality recording from the build-in cameras.  iMovie gives you more control over the recording settings but is harder to use.

Filmic Pro

This is an iOS (and Android) app built by a third-party that gives the film maker complete control over your recordings.  You can tweak the resolution, framerate, bitrate, audio, and other settings.  It comes at a cost, but is worth it if you need that level of control.

MacOS and the Webcam

If you own a MacBook or an iMac, you are blessed with a device that has all the hardware built-in to get decent quality recordings.  Below are a few apps that can help you capture the magic.

iMovie

This guide isn’t meant to be a full-blown tutorial on how to use iMovie, but if you have access to iMovie, it’s an easy way to get started recording and get professional results quickly with a

  • In iMovie, open File -> Import Media…
  • In the left column select FaceTime HD Camera, your webcam will be displayed.
  • Press the Record button in the middle and record your clip.  Press it again to stop.
  • Click Close.
  • In the My Media view, your new clip will appear.
  • Import it into a timeline (below), do any necessary trimming or adding other clips, or titles.
  • Choose the Share button in the top-right of iMovie to export your video to a file.

QuickTime

MacOS comes pre-installed with QuickTime.  You can use QuickTime to capture your webcam and built-in microphone.  To capture a movie in QuickTime, try this.

  • Find and launch the QuickTime Player app.
  • Open File -> New Movie Recording.
  • Click the red record button.
  • Save and upload your movie file to myHeritage.

Publish

At Heritage, we use myHeritage (Populi) to publish our course content.  For your course, this can be done from the Lessons tab.

Upload them from your computer

  • Click the Add a Lesson button or open an existing lesson.
  • Click the Design tab to open the design view.
  • Choose to Add a Section and click File.
  • Drag and drop the file from your computer into the area that says Drag & Drop.
  • Once the video file is uploaded, click Save.  If this is a video file, the size is likely huge, so be patient.
  • There are other options in this view like marking a file as required.
  • When you save the file, Populi kicks off an encoding process (much like YouTube’s encoding) to get it ready for multiple device types.

Upload them directly from your phone or tablet

If you’ve recorded your file on a smartphone or tablet, you can upload them directly to myHeritage.

  • Open myHeritage is a browser (Safari, Firefox, Chrome, etc.) and login with your myHeritage account.
  • Navigate to your course and open the Lessons tab.
  • Touch the Add a Lesson button or open an existing lesson.
  • Touch the Design tab to open the design view.
  • Choose to Add a Section and click File.
  • Touch on the area that says Drag & Drop a File or Click to Choose.  This will open the file explorer on your platform.
  • For example, on iOS choose Photo Library.  Find the video you took (or edited) and touch Done.
  • Once the video file is uploaded, click Save

Populi has published a more detailed article on this topic called How to embed audio, video, and other kinds of files in a lesson.  Feel free to check it out for more info.

Setting Up A Connected Classroom

Ahead of this coming semester, I wanted to share this tutorial video called Setting up a Connected Classroom.  It shows how to get set up in the classrooms, focusing on using the room equipment (mics, camera, computer) and connecting to a video call. There are four easy steps to get setup and ready on the day of your class.

  1. Turn on the room equipment
  2. Connect your laptop or tablet to the system
  3. Join a video call with Microsoft Teams or Zoom
  4. Turn off the system

This quick tutorial is meant to be an overview of the system and does not go into great detail on any particular topic.

Setup a video call in Microsoft Teams

You can setup a video call in Microsoft Teams in a number of ways. The methods shown in the video and in the guide below will help you generate a Teams Meeting link to share with co-workers, students, or guests.

Using the Outlook App

  1. Using Outlook.  Open the Calendar and click the big New Teams Meeting button at the top in the Ribbon.  This will generate a Teams Meeting link.
  2. Give it a title, choose additional required or optional attendees and click Send.  If you’re adding other folks from Heritage, you can of course add them to the meeting.  When you click Send, they will receive a calendar invite, and the meeting will appear in their calendar and your calendar.  The meeting will also appear in the Teams app under Calendar.
  3. If you want to share the meeting link with students, simply right-click on the ‘Join Microsoft Teams Meeting’ link and choose Copy hyperlink.  Then paste that into an email to send it to your students or paste it on myHeritage in the Links section of your course under the Syllabus tab.

Using the Teams App

Meet Now

  1. In the Microsoft Teams app, open the Calendar tab (which is located on the left under the Chat tab and the Teams tab).  Click the Meet now button at the top.
  2. Give the meeting a title and click the Join now button.
  3. Open the Participants view by clicking the Show Participants button in the control bar (just to the left of the Hang up button).
  4. In participants view copy the meeting link by clicking on the Copy join info button in the top-right.  It looks like two elongated rings hooked together.
  5. Then paste that into an email to send it to your students or paste it on myHeritage in the Links section of your course under the Syllabus tab.

New Meeting

  1. Inside of Teams choose the Calendar tab and click the + New meeting button at the top.
  2. Give your meeting a title and add any required attendees.  In order to generate a meeting link, you must add at least one other person from Heritage to the meeting.
  3. Click Save.
  4. After the meeting has saved, go back into the meeting and note that the Teams Meeting link has been generated.  Copy and paste the Join Microsoft Teams Meeting link and send it to your students or post it on myHeritage.

Create a Password-Protected Document using Microsoft Word

To create a password-protected PDF document from a Microsoft Word document, follow these steps.

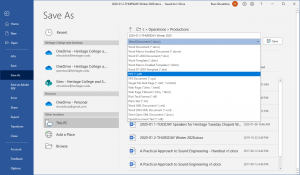
  1. With the Word document already open, choose Files -> Save As.
  2. In the file type drop-down choose PDF (*.pdf) as the option.
  3. Click the More options… link directly beneith the file type drop-down.
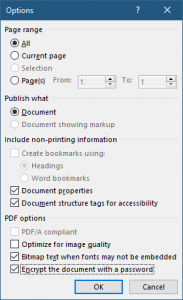
  4. In the Save as dialog that appears click the Options… button.
  5. At the very bottom of the Options dialog choose Encrypt the document with a password and click OK.
  6. Enter the password twice to confirm and choose OK.
  7. Type a File name for the PDF file and choose Save.  This action will create a password-protected PDF document in the folder you’ve selected.

Remotely accessing your computer from outside the Heritage network

There are times, where you may need to access your desktop computer from outside the Heritage network.  If you are in a role that requires you to use a desktop computer and do not have a Heritage-provided machine at home, use the steps below to create a Remote Desktop Connection to your computer in the office.

Remote Into Your Computer

First, create a VPN tunnel between your home computer and the Heritage Network.  Follow these steps to create the secure tunnel between your computer and the Heritage network BEFORE you attempt to open a Remote Desktop Connection.  The VPN connection will automatically time out after a while, so you will need to reconnect it each time you want to remotely access your computer.

Second, use Remote Desktop to access your computer using the instructions below.

Use Remote Desktop to connect to your computer – Windows 10

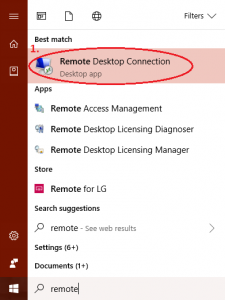
  1. Open Remote Desktop Connection.  Open the Start menu and search for “Remote Desktop Connection” (the word remote will typically suffice).  Open the app.  Then click Show Options.
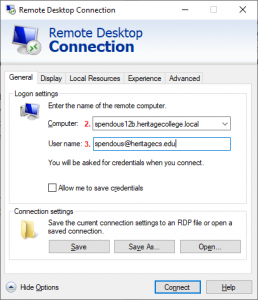
  2. In the Computer field type the full name of the computer you want to connect to.  The full name of your computer is the name of your computer followed by heritagecollege.local.  For example, if Stu Pendous was trying to connect to his computer the full name would be
    spendous12b.heritagecollege.local

    To find out the name of your computer, please send a message to helpdesk@heritagecs.edu.

  3. In the User name field type in your fully qualified username, which in most cases will be your email address (the fully qualified user name for Stu Pendous would be spendous@heritagecs.edu). Press Connect or hit ENTER.  The connection will be established, this may take a moment.
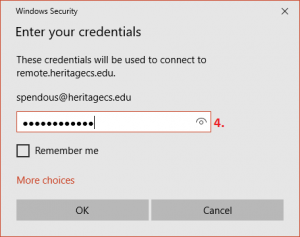
  4. Enter your Heritage password.
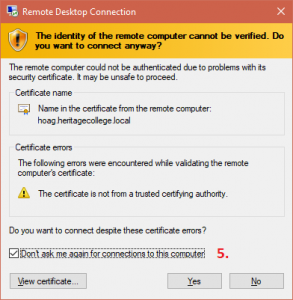
  5. Confirm the security certificate by checking the checkbox and clicking Yes. This certificate is issued by the remote computer which is managed by the IT department at Heritage. The name in the certificate issued by the remote computer will be the name of the computer you’re connecting to.
  6. Once you press Yes in previous dialog, you should be logged in to your desktop computer that is on the Heritage network.  From there you can operate the computer as if you were sitting in front of it and you will have access to all the same resources.

Use Remote Desktop to connect to your computer – iOS and iPad OS

This tutorial will satisfy the need of users on the iPhone, iPad, and iPod Touch devices.  It was tested on iOS 11 but the methodology is the same even on older versions of iOS and iPad OS.

  1. Download and install the Microsoft Remote Desktop app from the iOS App Store.
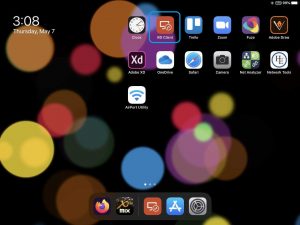
  2. Open the newly installed app (it may appear as RD Client on your homescreen).
  3. In the Remote Desktop app press the + (plus) button in the top right.  Choose Desktop from the list of choices.
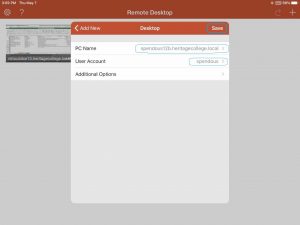
  4. In the Desktop dialog enter the following settings.
    1. In the PC Name type the full name of the computer you want to connect to.  The full name of your computer is the hostname followed by heritagecollege.local.  For example, if Stu Pendous was trying to connect to his computer the full name might be
      spendous12b.heritagecollege.local

      To find out the name of your computer, please send a message to helpdesk@heritagecs.edu.

    2. In the User Account field you can choose to enter your account information every time or to save it.  Please keep in mind who might have access to your iOS device and use that information to make a wise choice about saving your account information or not.  You will need to enter your full User Name and your Password.  For example, the User Name for Stu Pendous would be spendous@heritagecs.edu).
    3. Click Save.  This will save the remote desktop profile so can easily reuse it.
  5. Once the profile is saved simply touch on the profile to launch the remote session and access the remote computer.

Use Remote Desktop to connect to your computer – MacOS

These settings for iOS and iPad OS will also work for MacOS.  Simply install Microsoft Remote Desktop from the App Store, Add a PC configuration using the following settings, and connect.

  • PC name: The name of your desktop computer such as spendous12b.heritagecs.edu
  • User account: Use your Heritage email address and password
  • Click the Add button

Other Options

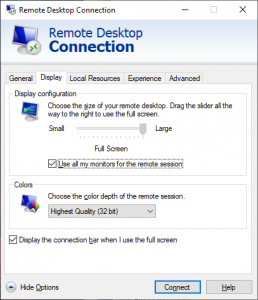
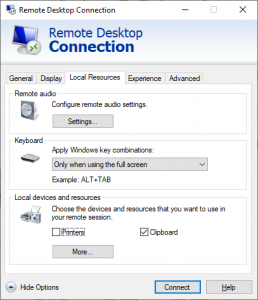
Others options to be aware of are things like copying files between your computer and the remote computer, or sharing audio or multiple displays.  To get to options click the small Show Options drop-down in the Remote Desktop Connection window.  Doing this will make five tabs appear along the top edge.  General, Display, Local Resources, Experience, and Advanced.

  • On the Display tab there are options for telling Remote Desktop how to handle multiple displays if you have multiple monitors plugged into the computer you are using to remotely access your computer at work.  You can also choose quality settings specifically.
  • The Local Resources tab is where you can affects settings related to the sharing of audio, printers, and the clipboard.  By default, the Clipboard is shared between your computer and the remote computer.  This enables you to copy and paste text between computer, and it will also allow you to copy files and folders between your computer and the remote computer (very handy).  Please note that sharing large files between computer could take a long time depending on the size of the file and the speed of your internet connection.
  • By default, audio is shared between computer, if you want to disable this go to the Local Resources tab and click on the Settings… button under Remote audio.  In the dialog box that appears choose Do not play under the Remote audio playback section and click OK.

Connecting to the Heritage Network using a VPN

VPN stands for Virtual Private Network.  In this tutorial we will discuss how to create a VPN connection to the Heritage network when you are off campus.  This can be useful if you want to access resources that are only available on-site such as the file server or a desktop computer.  Establishing a VPN connection between your computer and Heritage will create a secure tunnel where data can flow securely between your computer and the Heritage network.

Creating a VPN Connection

Windows 10

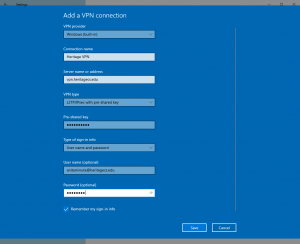
  1. Open the Start menu and choose Settings.  Look for and open Network & Internet
  2. From the Network & Internet sub-menu, choose VPN
  3. Click Add a VPN connection
  4. In the VPN Provider field choose Windows (built-in)
  5. In the Connection name field type a friendly name such as Heritage VPN
  6. In Server name or address field type
    vpn.heritagecs.edu
  7. In the VPN type field choose L2TP/IPsec with pre-shared key
  8. Enter the Pre-shared key into the Pre-shared key field.  The Pre-shared key can be found in the Heritage VPN Access email sent by a Heritage IT Admin.
  9. In the Username field type your full Heritage Username – this is likely your email address (such as anitaminute@heritagecs.edu).
  10. Type your Heritage Password into the Password field.
  11. Click Save to save the settings.
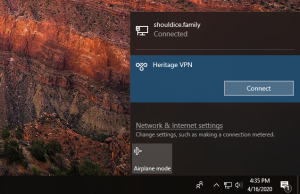
  12. The VPN connection is now configured.  To establish a VPN connection between your computer and Heritage simply choose the new connection and press Connect.

You can also access this connection extremely easily from the network icon in the Taskbar.  In the lower-right corner of the Taskbar, look for the network icon (it could be a wireless icon if you’re on Wi-Fi or a little Monitor-with-network-cable icon if you’re using a wired connection).  Click the icon.  If you completed the steps above to create a VPN connection, the new connection will be available from this menu.  Just click it a choose Connect.

iOS

Creating a VPN connection profile is easy to do on iOS and provide a secure tunnel from your device into the Heritage network.

  1. Open  the Settings app.
  2. Go to General -> VPN.  You’ll need to scroll down as its near the bottom.
  3. Choose Add VPN Configuration…
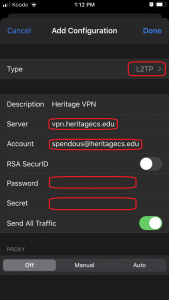
  4. In the Add Configuration screen for Type choose L2TP
  5. In the Description field type a friendly name such as Heritage VPN
  6. In Server field type
    vpn.heritagecs.edu
  7. In the Account field type your Heritage Username – this is likely your email
  8. Type your Heritage Password into the Password field.
  9. In the Secret field, very carefully, type in the Secret code.  Contact the IT department for this code.
  10. Choose Done at the top right.
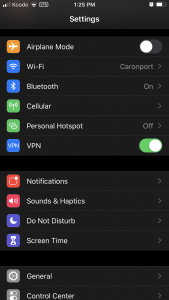
  11. The VPN connection is now configured and you will move back to the VPN screen.  To test the connection click the slider to the right of Status.  The connection will be established and the status will change to say Connected.

Additionally, now that the VPN settings are configured you can turn the connection on and off easily from the main Settings App screen.  A new entry called VPN will have appeared near the top.

MacOS

Creating a VPN connection profile is easy to do on iOS and provide a secure tunnel from your device into the Heritage network.

  1. Open  the System Preferences app
  2. Go to Network.  Click the + (plus) button in the lower left-hand corner of the Network window to add a new connection
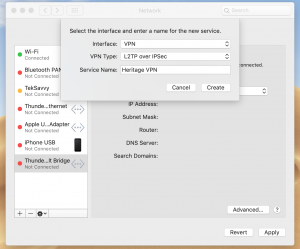
  3. In the Interface drop-down choose VPN
  4. In the VPN Type drop-down L2TP over IPSec
  5. In the Service Name field type a friendly name such as Heritage VPN.  Click Create
  6. In Server Address field type
    vpn.heritagecs.edu
  7. In the Account Name field type your Heritage Username – this is likely your email
  8. Click the Authentication Settings button.  Type your Heritage Password into the Password field
  9. In the Shared Secret field, very carefully, type in the Secret code.  Contact the IT department for this code.  Click OK
  10. Choose Apply in the bottom right
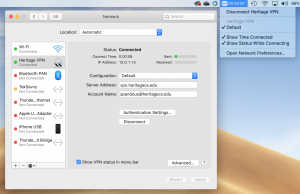
  11. The VPN connection is now configured.  To initiate the connection between your Mac and the Heritage campus click the Connect button.  You may also choose to enable the Show VPN status in the menu bar to provide a quick and easy place to initiate the connection.  With this enabled, you can simply click Connect Heritage VPN to make the connection.

Other Awesome Stuff

Now that you’ve established a VPN connection you can do awesome stuff like remotely access your desktop computer as if you were sitting in the office at Heritage.

If you have a Heritage-deployed laptop, after establishing the VPN connection, you should be able to access your Home drive and the Staff drive like you normally would by going through File Explorer and opening those drives.  Please note that opening those network locations will be slower over the VPN connection than when you are physically on-site.

Record audio with an iOS device

This tutorial is a quick overview of getting a good-quality recording using an iOS device.  This method would be appropriate for an iPhone, iPad, or iPod touch.  The theories can also be translated to an Android device.  The basic steps are.

  1. Record audio with the Voice Memos app or a similar app.
  2. Upload the file to cloud storage, like Microsoft OneDrive (which you have access to with your Heritage account), Google Drive, Dropbox, or something similar.
  3. From that point you can access the file and download it so you can post it on your class in myHeritage.

Recording basics with Audacity

Hello folks!  This video is meant as a brief introduction to recording audio with Audacity.  We record an audio clip and do some minor tweaking to the sound quality before exporting it for publication.

The audio you hear in this tutorial was recorded with the build-in mic from a USB webcam.  Super simple.  To record into Audacity, other microphone options could include the build-in microphone in a laptop, the in-line microphone on simple wired earbuds, or even a large USB microphone.

Posting audio or video content to a course in myHeritage

  1. Login to myHeritage and navigate to your course (either under Academics -> Academic Term -> Courses or by going to My Profile -> Faculty) by clicking on the course name. The course Syllabus page will appear.
  2. Choose Lessons from the menu on the left.
  3. Choose a Lesson (if there are no Lessons in the course, click the Add a Lesson button on the right).
  4. From the Lesson view there are two tabs, View and Design. Choose the Design tab.
  5. From the Design tab you have the ability to Add a section. Click the small link that says File to add a media file.
  6. Drag and drop the media file into the upload area that appears or click the area to choose a file.
  7. Once the file has completed uploading, click the Save

Please see the How To Embed Audio, Video, And Other Kinds of Files In A Lesson article on the Populi Knowledgebase for similar instructions and further details.

Note: To view the newly uploaded file like a student would see it, go back to the View tab (from Design).  When you are uploading the file you also have options to Hide the file or use the media player built in to myHeritage (strongly recommended).  Also, there is a file size limit of 4GB per file.